
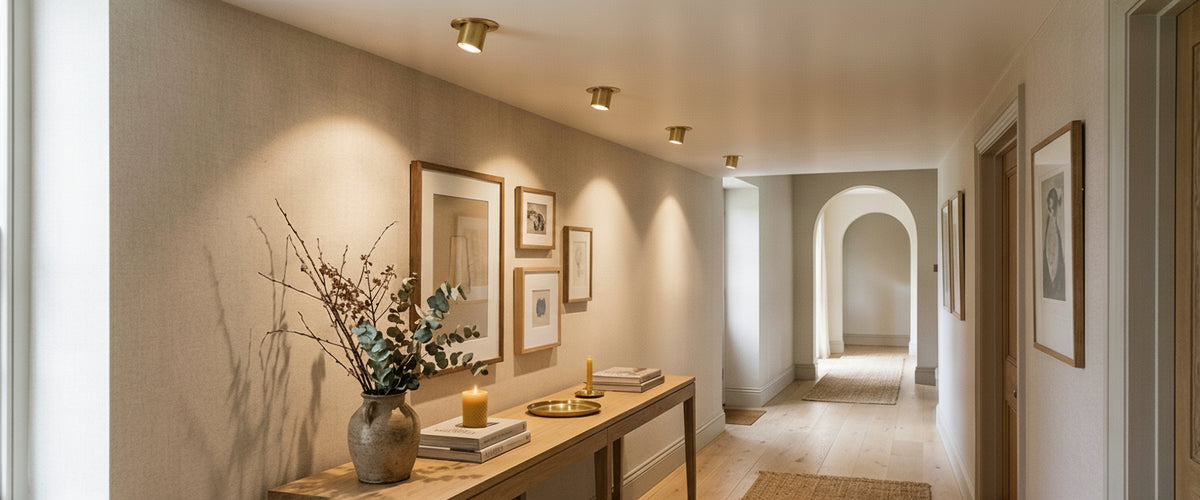

The difference between downlight spotlight fittings comes down to beam angle and aim. A downlight spreads a wide beam, often 60 degrees or more, straight down for even, general light. A spotlight narrows its beam to roughly 10 to 40 degrees and can usually tilt, so you can aim it at art, shelving or a textured wall. That is the short answer. On a finished ceiling it decides whether a room feels evenly lit or carefully lit, and whether the alabaster pendant at its center reads as a glowing object or gets washed flat. It is also a mistake people make all the time: thirty holes in a freshly plastered ceiling, thirty fittings installed, and not one could be pointed at the paintings they were bought for, because someone ordered "spotlights" and received fixed downlights. This guide covers the hardware clues, dimming and the rooms that suit each type.
Quick answer
Downlights are usually fixed, wide-beam fittings that cast general light straight down to light the floor and the people moving across it.
Spotlights are usually narrower-beam fittings, often adjustable, that pick out a specific object, wall or surface.
The two terms get swapped constantly in retail listings, so the difference between downlight spotlight fittings is easy to miss. Check the beam angle and whether the fitting tilts before you buy.
They often need different dimmers or drivers, which matters if you want them on separate circuits.
Neither replaces decorative light. Recessed fittings set the background; alabaster and stone pieces give a room its warmth.

Why Downlights and Spotlights Get Confused
Part of the muddle is linguistic. In everyday speech, especially in Britain, any small round light set into a ceiling gets called a "spot." Manufacturers and retailers then list the same fitting under both names to catch both searches, so a fixed GU10 can appear as a "recessed spotlight" on one site and a "downlight" on another. Ask whether downlights and spotlights are the same, and the honest answer is that the catalog often treats them as the same, while the light they produce does not. Retail copy rarely explains the spotlight and downlight difference at all, so buyers fill the gap with guesswork.
The errors that follow are predictable, and each one starts at the ordering stage, when the difference between downlights and spotlights gets ignored. People buy fixed fittings for a picture wall and end up with scallops of light on the floor instead of on the canvas. Or they buy narrow adjustable spots for a kitchen and get hard pools with dark gaps between them, so the worktop looks patchy. We see a third version in the studio: a client in a Chelsea townhouse sent us photos of a new onyx chandelier that "looked dull," and the culprit was a grid of wide downlights around it, flooding the ceiling plane so the stone had nothing to glow against.

Beam Angle Is the Real Difference Between Downlight Spotlight Fittings
Strip away the marketing and the choice between spotlights and downlights comes down to two things: how wide the beam spreads, and whether you can aim it. A wide downlight cone washes the floor; a narrow spot holds its edge on the wall.
A typical downlight throws a broad cone, often somewhere around 60 degrees or wider, so on a standard 8 ft (2.4 m) ceiling its light overlaps neatly with the next fitting along. That overlap is the point. You get even, ambient coverage without anyone noticing the source.
A spotlight tightens that cone, commonly somewhere in the region of 10 to 40 degrees, concentrating the light into a defined pool. Narrow beams travel further and hold their edge, which is why they suit artwork, joinery and textured walls. The same lumen output reads completely differently depending on how tightly it is focused, which is why lighting designers treat beam spread as the core difference between downlight spotlight fittings rather than a detail.
Directionality is the second half of the difference between downlights and spotlights. Most downlights point straight down and stay there. A true spotlight tilts, swivels, or both, so you can correct its aim after installation. If the product page does not mention tilt angle, assume there is none. You can compare both types side by side in our spotlights and downlights range.
Where a Fixed Downlight Belongs and Where an Adjustable Spot Earns Its Place
Kitchens and Bathrooms
Fixed downlights are the workhorse here, and the difference between downlight spotlight fittings works in their favor: wide, even coverage is exactly what a work surface needs. Place them over the front edge of worktops rather than in the middle of the room, so your body does not cast a shadow onto the chopping board. In bathrooms, check the IP rating (the ingress protection code set by the International Electrotechnical Commission) for each zone and leave the selection and wiring to a qualified electrician, since wet-area requirements are strict.
Living Rooms and Libraries
This is spotlight territory, and the difference between downlight spotlight types shows most clearly here. A few adjustable fittings angled at shelving, a fireplace wall or a framed print give the room depth. Because furniture and art tend to move after the ceiling is finished, a fitting you can re-aim, such as the TRIBIS II 10W GU10 Recessed Spotlight Adjustable in Black, makes more sense here than a fixed downlight. Keep general light low and let table lamps and floor lamps carry the evening. A carved alabaster table lamp beside a sofa does more for the mood than another four recessed fittings ever will.
Dining Rooms and Entrance Halls
Here the decorative fitting leads, and placement matters more than the difference between downlight spotlight types. If you have a stone pendant or chandelier over the table, browse the alabaster lighting collection first and plan the recessed layer around it, not the other way around. One or two narrow spots aimed at a sideboard or console are usually enough. In a hallway, wide downlights spaced along the run keep the floor safe to cross, while a single tilted spot can graze a stone wall and bring out its texture.
Mixing Spotlights and Downlights on One Ceiling
Using downlights and spotlights together is common and often right. The layering works when the difference between downlight spotlight jobs stays clear: downlights for floor-level ambient light, spots for a couple of deliberate focal points, and decorative stone fittings for warmth at eye level.
It goes wrong when the beams compete and the difference between downlight spotlight roles gets blurred. A narrow spot landing inside the wide pool of a downlight simply vanishes, and you have spent money on a fitting nobody can see. Give every spotlight and downlight its own patch of ceiling instead. Two different color temperatures on the same ceiling, say a 2700K downlight next to a 4000K spot, make whites look dirty and alabaster look gray. Keep everything at the same warm temperature, ideally 2700K, so the honeyed tone of the stone stays true.
A Napa client of ours learned this the expensive way. Her contractor installed adjustable spots and fixed downlights in an alternating pattern across a dining room ceiling, all on one switch. With everything on, the room looked like a showroom. We suggested splitting the circuits and turning the downlights off at dinner, leaving the spots on the art and the alabaster chandelier doing the real work. Same hardware, entirely different room, simply because the switching finally respected the difference between downlight spotlight roles.
Trim, Aperture and Housing: How to Tell Which One You Are Holding
Labels lie, but hardware does not. A few physical clues tell you quickly which type you have, and they show the difference between downlight spotlight fittings faster than any box:
Gimbal or tilt mechanism. If the inner ring or lamp holder pivots, it is a spotlight, whatever the box says.
Recessed or deep-set lamp. A lamp sitting well back inside the housing usually signals an anti-glare fitting designed for focused accent light.
Flush, flat trim with an opal diffuser. This points to a downlight designed for even, soft spread.
Aperture size. Smaller apertures tend to go with narrower beams; larger ones with wide ambient light, though this is a tendency, not a rule.
Lamp type. GU10 runs on mains voltage. MR16 with a GU5.3 base usually runs at low voltage and needs a transformer or driver.
Finish matters too, even though it sits outside the beam-and-aim difference between downlights and spotlights. A patinated brass or matte black trim can sit quietly beside brass detailing on stone fittings, while bright chrome tends to fight with the warmth of alabaster. Where a ceiling shares the room with a brass-mounted alabaster pendant or wall light, a warmer trim like the TRIBIS II AB GU10 Recessed Spotlight in Patinated Brass lets the recessed layer echo the metalwork rather than compete with it.
Dimming and Driver Compatibility
This is the least glamorous part of the difference between downlight spotlight fittings, and the one most likely to cause flicker and buzzing. Mains GU10 fittings and low-voltage MR16 fittings behave differently on a dimmer, because the low-voltage versions have a transformer or driver between the switch and the lamp. Not every driver works with every dimmer. If you are drawn to a slim low-voltage fitting such as the Seidy GU5.3 MR16 Recessed Spotlight in Matte White, which disappears neatly into a white ceiling, budget for the driver and confirm it suits your dimmer before you commit.
Most modern LED lamps prefer trailing-edge dimmers, and many need a minimum load before they dim smoothly. Put a run of LED downlights on the same dimmer as a handful of low-voltage spots and the difference between downlight spotlight electronics shows up fast: one group dims cleanly while the other flickers at the bottom of the range. Separate circuits solve this and give you the scene control described above. Always ask a qualified electrician to confirm dimmer, driver and lamp compatibility before anything is installed; this is not a DIY job.
The same logic applies to your decorative fittings. Alabaster pendants and wall lights look best dimmed low, so put them on their own dimmable circuit with a lamp rated for dimming.
Buyer Checklist Before You Cut Holes in the Ceiling
Write down what each fitting must light: floor, worktop, wall or object.
Check beam angle in degrees, since that is the difference between downlight spotlight fittings that counts, not the name on the listing.
Confirm whether the fitting tilts, and by how much.
Match color temperature across every recessed fitting and decorative light in the room.
Choose GU10 or MR16 deliberately, and know which needs a driver.
Plan separate circuits for ambient downlights, accent spots and decorative pieces.
Check ceiling void depth and fire-rating requirements with your electrician.
Position spots so they never shine into eyes from a sofa or dining chair.
Decide where your pendant, chandelier or wall lights go first, then fit the grid around them.
Let the Stone Do the Talking
Once you understand the difference between downlight spotlight fittings, and where decorative light sits alongside them, recessed fittings become the quiet part of a lighting scheme. Get the beam angles right, keep the color temperature warm and split the controls, and they will disappear into the ceiling as they should. The character of the room comes from what sits below them. Niori designs alabaster and natural-stone pendants, chandeliers, wall lights, table lamps and floor lamps for exactly that role, and you can see how they layer with simpler fittings across the full lighting range. For larger projects, ask us for a tailored quote; scale, material and finishing all shape the final budget.