
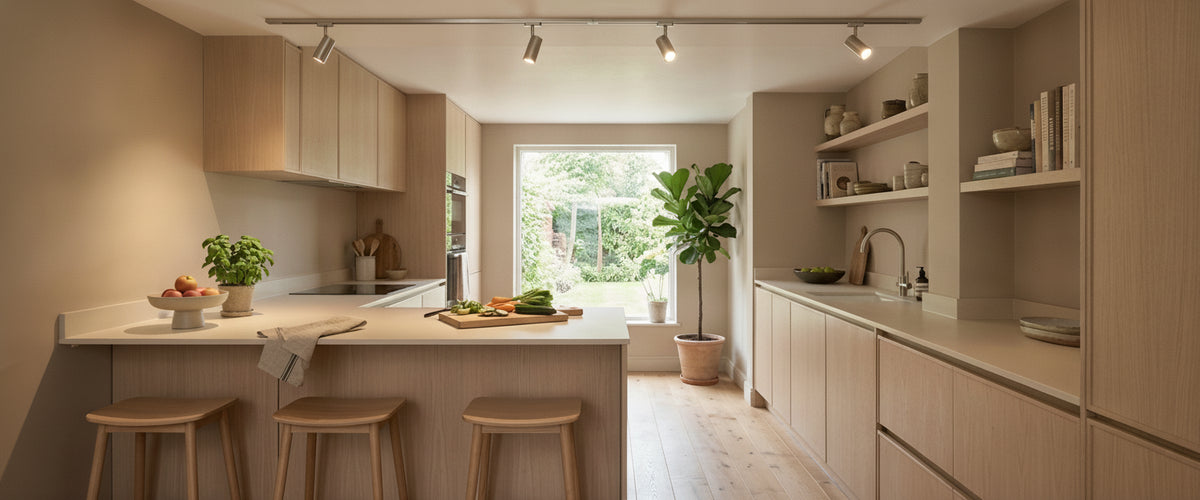

A track lighting kitchen ceiling plan works best when the run sits just above the front edge of the countertop and every head is angled onto the counters rather than the floor. It suits galley and L-shaped layouts, especially where joists or concrete slabs rule out recessed downlights. It struggles over islands and in small, low rooms, where pendants or a single flush fixture usually do the job better.
The most common kitchen lighting complaint is simple: the light lands behind the person cooking. Match the track to your ceiling height and countertop layout, and you can put light exactly where the work happens. Fit it in the wrong place, though, and you get a row of bright dots on the floor and a dim countertop with your own silhouette across it. Kitchen ceiling track lighting rewards planning more than most fixtures, so it is worth settling a few decisions before anything goes on the ceiling.

At a Glance
Best for: galley kitchens, long runs of countertop, and rooms where a ceiling full of recessed downlights is impractical because of joists or concrete slabs.
Choose multi-circuit track if you want task and ambient light on separate switches or dimmers.
Mix beam angles: narrow heads for task, wider heads for general wash.
Position the track lighting kitchen ceiling run over the front edge of the countertop, not the center of the room, so light falls ahead of the cook.
Judge finishes under your own bulbs at the color temperature you will actually use.
Pair track with softer sources, such as alabaster pendants or wall lights, so the kitchen does not feel like a gallery after dinner.

Is Track Lighting on a Kitchen Ceiling Right for Your Layout?
Track earns its place in kitchens where the work happens along a line. A galley is the clearest example of track lighting kitchen ceiling design done right: one or two runs of track parallel to the countertops, heads angled onto the counters, and the room is lit. L-shaped kitchens work too, as long as you accept two separate runs rather than trying to bend a single track around the corner and ending up with heads that cannot quite reach either leg.
In a galley, a run parallel to the countertop with heads angled onto the counter lights the whole working line.
It also suits buildings where recessed lights are a headache. Converted warehouses with exposed concrete, older apartments with ornate or fragile plaster, and rental kitchens where cutting holes is not an option all benefit from kitchen ceiling track lighting, a surface-mounted system fed from one or two existing points.
A track lighting kitchen ceiling run fights the room in small, square kitchens with a low ceiling, where a long bar of metal overhead dominates everything. In that kind of space, a single diffused flush fixture such as the Albers 1 Light Flush Ceiling Light in black with an opal glass shade usually sits more comfortably than a run of spots, spreading even light without adding visual clutter at head height.
Kitchen ceiling track lighting also struggles over islands. A run above an island tends to throw light straight down onto heads and shoulders, and it misses the social quality an island needs. A pair of pendants does better. This is where we often suggest the track handles the perimeter countertops while carved alabaster pendants hang over the island. The alabaster lighting collection has pendants that give a warm, diffused glow in the middle of the room while the track does the precise work at the edges.
Single-Circuit vs Multi-Circuit Track
This is the decision people skip, and the one they regret. Single-circuit track lighting on a kitchen ceiling puts every head on one switch. Everything comes on together and dims together. That is fine for a small galley with four heads all doing the same job.
Multi-circuit track, usually three-circuit, carries separate feeds along the same bar. Each head is set to one of the circuits with a small selector on its adaptor, so you can run the countertop spots on one switch, the heads washing the wall or shelves on another, and a third circuit for something else entirely. Once the track is fixed and the switching wired, upgrading from single to multi-circuit means taking it all down and possibly rewiring the switch plate. Choose three-circuit at the start and your track lighting kitchen ceiling layout stays flexible for years.
Two practical cautions. Track systems are rarely cross-compatible, so buy the heads, connectors and track from one system. And every part of the installation, from the feed to the switching and dimming, should be carried out by a qualified electrician. Lighting circuits fall under building regulations, and a licensed professional will know what needs testing, certifying and notifying. The Lighting Industry Association is a useful starting point for understanding product standards before you buy any kitchen ceiling track lighting.
Beam Angles and Head Types: Task Precision vs Ambient Wash
The beam angle decides whether a head on your kitchen ceiling track lighting behaves like a flashlight or a floodlight. Narrow beams of roughly 10 to 25 degrees give a tight, intense pool of light: good for picking out a chopping area or a piece of artwork above the range. Medium beams around 30 to 40 degrees are the kitchen workhorse, lighting a useful stretch of countertop without harsh edges. Wide beams of 50 degrees or more wash walls and cabinet fronts and do the job of general light.
A common track lighting kitchen ceiling mistake is buying every head at the same angle. The result is either patchy (all narrow) or flat and glary (all wide). A better mix is mostly medium heads over the countertops with one or two wide heads angled onto a wall or tall run of cabinets to lift the overall brightness.
Look at color rendering too. A CRI of 90 or above makes food look like food, which matters when you are judging whether chicken is cooked or a sauce has caught. For color temperature, 3000K sits comfortably with warm materials such as oak, brass and alabaster, while 4000K reads cleaner and cooler and suits white or gray kitchens used mostly for serious cooking. The Society of Light and Lighting publishes guidance on task lighting that is worth reading if you are specifying a larger or commercial kitchen.
Spacing Heads So Hot Spots and Dead Zones Never Appear
Spacing is where kitchen ceiling track lighting succeeds or fails. The aim is for the pools of light from neighboring heads to overlap slightly on the countertop, so the surface looks evenly lit rather than striped.
Start from the countertop, not the ceiling. Mark where you prepare food, where the cooktop and sink are, and light those first.
Use the beam angle to set the gap. Wider beams can sit further apart; narrow beams need to be closer together or they leave dark bands.
As a working rule, heads roughly 2 to 3 feet (60 to 90 cm) apart suit most medium-beam heads on a standard-height ceiling.
Keep the ends in. The last head on a run should sit a little inside the end of the countertop so the light does not spill onto the wall at the corner.
Leave a spare slot. Most track takes extra heads later, so buy a run long enough to add one without replacing the bar.
Ceiling Height, Joinery Depth and the Shadow Problem
Stand at a countertop with a light directly behind you and you block it. A track lighting kitchen ceiling run fixed along the center line of the room does exactly this. The fix is geometry: run the track roughly above the front edge of the countertop, or slightly in front of it, and angle the heads back toward the wall at around 30 degrees from vertical. Light then lands on the counter ahead of your hands, and the angle keeps the bulb out of your eyes.
Wall cabinets complicate it. A standard countertop is around 24 inches (60 cm) deep, with wall units usually 12 to 14 inches (30 to 35 cm) deep above it. If the track sits too close to the wall, the cabinet underside blocks the beam and the back of the counter falls into shadow. Too far out, and your head is in the way again. On a typical 8-foot (2.4 m) ceiling, the sweet spot tends to be a narrow band just beyond the front of the wall units.
Setting the run just beyond the wall units keeps the beam clear of the cabinets and the cook out of their own light.
A typical version of this mistake: the track is set 12 inches (30 cm) from the wall so it lines up neatly with a ceiling beam, and the cook ends up chopping in their own shadow every evening. Moving the run forward by around 10 inches (25 cm) and adding under-cabinet strips usually solves it. On high ceilings of 10 feet (3 m) or more, the bigger risk with kitchen ceiling track lighting is light spreading too thin before it reaches the countertop, so you will want narrower beams or suspended track. In a tall warehouse-style kitchen with dark joinery, a higher-output head in a warm tone, such as the Display Wide Track Light 38W 3000K in black, keeps enough light reaching the counter while the black body reads as part of the industrial line rather than fighting it.
Reading Finishes Against Cabinetry Under Working Light
Showroom light is kind. Your kitchen at 7pm in November, lit by 4000K LEDs, is not. Test finishes on your kitchen ceiling track lighting under both 3000K and 4000K sources, because the differences can be sharp. A brushed brass that looks honey-warm under warm light can turn faintly green beside sage cabinetry under cooler light. Matte black heads almost vanish against dark navy or charcoal units, but read as heavy and busy against pale oak.
White track disappears into a white ceiling and suits minimal kitchens.
Black track makes a graphic line and works with industrial or dark joinery.
Brass or bronze ties in with brass handles, faucets and the detailing on stone pendants, but test it under your chosen color temperature first.
For a white or pale gray galley on a standard-height ceiling, where the track lighting kitchen ceiling run should all but disappear and the light should read crisp over the countertop, a more modest head such as the Display Wide Track Light 19W 4000K in white is closer to the right balance than a heavier, higher-output fixture.
Hold a sample head against a cabinet door at night, with only your planned bulbs on. If a supplier cannot send a sample, ask for photographs taken under the same color temperature you intend to use.
Buyer's Checklist Before You Order
Map task zones on the countertop and measure their length before drawing any track lighting kitchen ceiling layout.
Decide single or multi-circuit before the electrician quotes.
Confirm the ceiling can carry the track fixings, especially in older lath-and-plaster ceilings.
Choose beam angles for each zone rather than one angle for all.
Specify CRI 90 or above and one color temperature throughout.
Check dimmer compatibility with the LED heads.
Plan softer light for evenings: pendants over the island or table, wall lights, or a table lamp on an open shelf.
Get a quote that covers track, heads, connectors, fixings and installation, so the budget reflects the whole job rather than the bar alone.
Where Alabaster and Stone Fit Alongside Track
Kitchen ceiling track lighting is a precision tool. It will not make a kitchen feel warm on its own. Alabaster does the opposite: its natural veining and translucency scatter light into a soft, even glow with no hard beam at all. The two work well together. Let track handle the countertops, then hang an alabaster pendant or two over the table or island, or add a stone wall light by an open shelf, and switch the track off once cooking is done. Keep alabaster fixtures away from direct steam above the cooktop, and dust them with a dry, soft cloth rather than anything damp, since the stone is soft and porous.
At Niori we design alabaster and natural-stone lighting for exactly this kind of layered room. If you are planning a full kitchen scheme, the wider lighting collection shows how pendants, wall lights and lamps can sit alongside a practical track lighting kitchen ceiling system.