
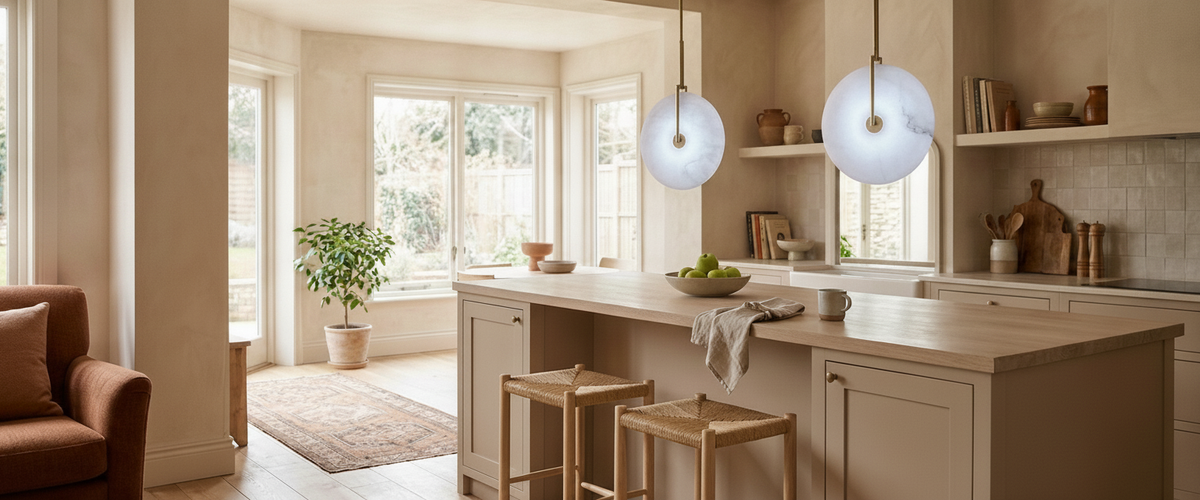

One ceiling fitting in the middle of the room is the reason you keep chopping onions in your own shadow. The overhead light sits behind you, your body blocks it, and the worktop goes dark exactly where you are working. Good kitchen lights fix that by giving each part of the room its own job, then blending those layers so the space reads as one. Get the kitchen lighting plan right and a stone pendant over the island stops being decoration and starts pulling real weight.
Niori works in alabaster and natural stone, so most of what follows leans on the warm, diffused glow those materials give. But the planning logic behind good kitchen lighting holds whatever you hang.

Key Takeaways
Map the kitchen into prep, cook, wash and gather zones before you buy a single fitting.
Task light the worktops first; a central ceiling light alone will always shadow you.
Hang island pendants roughly 30 to 36 inches (76 to 91 cm) above the surface so they light the counter, not your face.
Space downlights evenly and pull them away from wall cabinets to skip the runway-grid look.
Choose 2700K to 3000K for warmth that keeps food and worktops honest.
Put each layer on its own dimmer so one kitchen can read three different ways.

Map the Kitchen Before You Buy
Walk your kitchen and mark where you actually do things. There is the prep run where the knife work happens, the cooking zone at the hob, the wash zone at the sink, and the gather zone where people lean and talk while you finish dinner. Each one needs light aimed at it, not spilled near it. Good kitchen lighting starts with this map, not a catalog.
This mapping step is what separates a kitchen that works from one that photographs well and frustrates you daily. A client fitting out a narrow galley in a Victorian terrace assumed they needed more fittings; what they actually needed was to move light onto the two feet of worktop between hob and sink, where every task landed. Once you know your zones, the kitchen lighting list writes itself.
Task Light First: Where One Ceiling Fitting Leaves You in Shadow
Under-cabinet lighting is the least glamorous line on the plan and the one you will thank yourself for. Strips or pucks tucked beneath the upper cabinets throw light straight down onto the worktop, in front of you, where no amount of overhead brightness reaches once you lean in. This is the single kitchen lighting fix that solves the shadow problem for good.
Where there are no wall cabinets, over a run of open shelving or a window above the sink, you make up the task light with a well-placed downlight or a wall light angled at the surface. The principle stays the same: put the light source between you and the worktop, not behind your head. Browse the broader lighting collection if you want to see how wall lights and pendants can carry task duty in kitchens without a full run of uppers.
Island Pendants That Light the Surface, Not Your Forehead
Kitchen island lighting is where most people either overthink or underthink the height. Hang pendants too low and tall guests get a face full of glare; too high and the light scatters uselessly toward the ceiling. Aim for the underside of the pendant to sit around 30 to 36 inches (76 to 91 cm) above the island top. That keeps the light on the surface and clear of sightlines across the room.
For spacing, treat the pendants as a group. Two or three fittings over a standard island usually read best when they are centered as a cluster with even gaps, not pushed to the ends. Leave at least 6 inches (15 cm) between the outer pendant and the island edge so the light pools on stone rather than spilling off the side.
The surface underneath sets the ceiling for how much kitchen lighting you actually need. A marble-topped island like the Vanvorne Kitchen Island bounces a fair amount of what falls on it, so a diffused stone pendant reads better here than a bright directional spot that reflects straight back into your eyes.
Alabaster and onyx pendants earn their keep here because they diffuse the light. Instead of a hard bright point that reflects off a glossy worktop and dazzles you, a stone shade glows across its whole surface. The alabaster lighting range is built around exactly this quality, and over a marble top the veining in shade and stone talk to each other rather than compete.
Filling the Gaps With Downlights Without the Runway-Grid Look
Recessed downlights, what most people mean by can lights, are the workhorse of general kitchen lighting. The mistake is treating them as a grid problem: rows of evenly spaced holes marching across the ceiling like an airport apron. That grid lights the floor beautifully and the worktops badly.
Place downlights against the work instead. Run a line of them roughly 24 to 30 inches (60 to 76 cm) out from the wall cabinets so the beam lands on the front edge of the worktop, not the back of the cabinet doors. For a rough starting point on spacing, take the ceiling height in feet and space fittings that many feet apart; a 9-foot (2.7 m) ceiling suggests fittings around 9 feet apart, then adjust down where you need more light on a busy run. The Chartered Institution of Building Services Engineers publishes detailed guidance on kitchen lighting levels for domestic and commercial spaces if you want to go deeper (cibse.org).
Can light placement in a kitchen should follow the worktops and the traffic paths, not a symmetrical pattern for its own sake. A few well-aimed fittings beat a dozen badly placed ones, and that holds true for kitchen ceiling lights of every kind.
Colour Temperature That Keeps Worktops Honest
Colour temperature decides whether your food looks appetizing and your worktops read true. For most kitchens, 2700K to 3000K hits the sweet spot: warm enough to feel like home, clean enough to see what you are doing. Push past 4000K and the room turns clinical, tomatoes look gray, and warm-toned marble or timber loses its depth.
Watch the color rendering index too. A CRI of 90 or above shows color more faithfully, which matters when you are judging whether meat is cooked or a sauce has caught. Mixing color temperatures across layers is the other kitchen lighting trap; keep your under-cabinet strips, downlights and pendants within the same warm band so the kitchen does not glow three different colors at once.
When a Stone Pendant Earns Its Place Over the Island
A stone pendant over the island is doing two jobs: lighting the surface and anchoring the room visually. It earns its place when the island is a genuine gathering point rather than just extra worktop, and when the ceiling has the height to carry it. Alabaster and onyx pieces read as objects even when switched off, catching daylight through their translucent structure, which is why they work as the one sculptural note in an otherwise practical kitchen lighting scheme.
The island itself sets the scale you are lighting for. A generously proportioned oak-and-marble piece such as the Etvorne Kitchen Island can take a cluster of two or three pendants, whereas a compact island wants a single fitting so the group does not crowd the surface. When you plan pendant lights for kitchen islands, match pendant count to the length of stone you are lighting before you commit to a layout.
The natural stone matters for durability as well as looks. Alabaster is a form of gypsum and marble a metamorphic rock, both prized for the way they let light through their surface; the Natural Stone Institute has good background on how these materials behave (naturalstoneinstitute.org). Because each block is quarried, the veining in your pendant will never match anyone else's, which suits a room you designed around your own habits.
Dimming and Switching So One Kitchen Reads Three Ways
The final layer of any kitchen lighting plan is control. A kitchen with one switch has one mood: full brightness. Split your lighting so each layer runs on its own circuit and dimmer, and the same room becomes bright for prep, focused for cooking, and low and warm for a late glass of wine at the island.
A workable setup puts under-cabinet task lights on one control, downlights on another, and the island pendants on a third. Cooking mode brings up the task and cook zones. Gather mode drops the general downlights and lets the stone pendants carry the room. Confirm your LEDs are marked dimmable and matched to a compatible dimmer; the wrong pairing causes flicker and buzz. Any switching or new circuits should be signed off by a qualified electrician, and current guidance is worth checking through Electrical Safety First.
A Quick Buyer's Checklist
Zones mapped: prep, cook, wash and gather each have dedicated light.
Task light present: under-cabinet or angled fittings on every working run.
Pendant height: 30 to 36 inches (76 to 91 cm) above the island.
Downlights aimed: pulled 24 to 30 inches (60 to 76 cm) off the cabinets, no rigid grid.
Colour temperature: 2700K to 3000K, CRI 90 or above, consistent across layers.
Controls split: separate dimmers for task, general and feature lighting.
Budget for a stone pendant or a full kitchen lighting scheme depends on material, scale, engineering, installation and finishing, so it is worth asking for a tailored quote rather than working to a rough figure. Start by browsing the range on the Niori homepage to see how alabaster and natural stone behave once they are lit.