
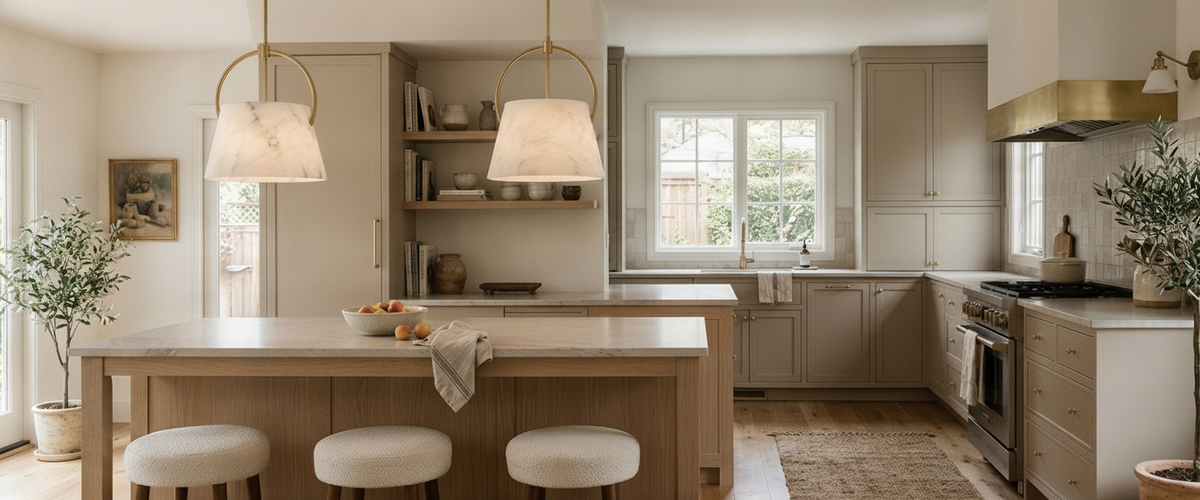

Most kitchen islands are lit badly, and it usually shows up in one of two ways: three pendants marching across the run at random intervals, or a single fitting stranded over a two-metre worktop leaving the ends in shadow. Pendant lights kitchen island layouts are one of the few decisions you cannot quietly fix later, because the position is fixed at first-fix wiring. Two pendants suit most standard islands and three suit longer runs; hang them 30 to 36 inches above the worktop and space them so their light pools overlap. Get the count, drop height and spacing right and the island reads as the anchor of the room. Get them wrong and no bulb choice will rescue it.
This is placement work first and shopping second. Below is how we talk kitchen island pendant lights through with clients before anyone chooses a finish.

Key Takeaways
Count by island length: two pendant lights over a kitchen island for most standard runs, three for longer runs. Odd numbers often sit more comfortably on a symmetrical island.
Drop height: aim for roughly 30 to 36 inches (76 to 91cm) between the worktop and the bottom of the pendant, adjusted for ceiling height and sightlines.
Spacing: centre the fittings on the island and space them so their light pools overlap rather than leaving dark gaps.
Consider a linear fitting when three separate pendants would crowd the run.
Warm dimmable bulbs keep prep light bright and the same fittings social after dark.

Counting Pendants by Island Length
Start with the worktop, not the ceiling. Measure the island length and let that decide the number of pendant lights over the kitchen island. A compact island of around 4 to 5 feet (1.2 to 1.5m) usually takes two lights. Stretch past 7 feet (2.1m) and three begins to make sense. Anything shorter than about 4 feet often looks best with a single generous fitting rather than a pair squeezed together. Good kitchen island lighting follows the measurements rather than a fixed idea of how many fittings you want.
Odd numbers tend to sit better on a symmetrical island because a centred fitting gives the eye a clear middle to read from, with the others balanced either side. That said, two pendant lights on a kitchen island remain the most common answer for good reason; they suit the majority of British kitchens and rarely look mean. The mistake we see most is choosing the number first, then trying to space it to fit. Reverse that order.
Diameter matters as much as count. Three small pendants can look busy over a wide island, while two larger fittings feel deliberate. If you are drawn to a cluster, treat it as a single visual object rather than three separate lights, and centre the group. Where you want the presence of several pendant lights over a kitchen island but only one clean fixing point, a piece such as the Dynamite Square Cluster Pendant Light reads as one deliberate object rather than three lights competing for the eye.
Drop Height Over the Worktop
The bottom of the fitting wants to sit high enough to clear sightlines across the island and low enough to feel connected to the surface. A working range for kitchen island pendant lights is 30 to 36 inches (76 to 91cm) from the worktop to the base of the shade. That keeps the bulb out of the eyeline of anyone standing on the far side and stops the fittings blocking the view when you are talking across the island.
Ceiling height shifts this. In a room with high or vaulted ceilings you can drop the lights a little lower to bring them into the room; in a standard-height kitchen, err towards the higher end so the fittings do not crowd a tall cook. Glare is the thing to watch. A bare filament bulb at eye level across a worktop is uncomfortable, which is one reason a diffusing material earns its place on pendant lights over a kitchen island. An alabaster shade turns a hard point source into a soft glow that you can look towards without wincing.
Spacing So the Light Pools Overlap
Centre the fittings along the length of the island first, then set them so their pools of light meet. If you space your kitchen island pendant lights purely for symmetry without thinking about the light, you get bright circles under each fitting and a dim patch between them, which is exactly the part of the worktop you chop on.
A rule of thumb for two lights: divide the island into thirds along its length and place a fitting on each dividing line, so each sits a third of the way in from its end. For three, quarters work; one at the centre and one either side. Check the front-to-back position too. The fittings should sit on the centre line of the island depth, not pushed towards one edge.
None of this replaces general kitchen lighting. Pendant lights over a kitchen island light the island; you still want ambient and task light elsewhere, which is where recessed kitchen ceiling lights come in. On spacing those, the Chartered Institution of Building Services Engineers offers useful guidance on lighting levels for domestic spaces, and a qualified electrician will translate that into a sensible ceiling layout for your room. Keep the downlights off the island itself so the hanging fittings own that zone.
When a Linear Fitting Beats Three Pendants
There is a point where three separate fittings stop helping. On a long, narrow island, or under a low ceiling, three kitchen island pendant lights can read as clutter and cast a stripy light. A single linear pendant, one elongated fitting suspended along the island axis, gives you an even wash of light and one clean horizontal line instead of three competing verticals. On a longer run where an even wash matters more than repeated verticals, an elongated fitting like the Gemini Pendant Light 105cm holds a single continuous line down the island axis.
Linear fittings also solve a practical problem: one ceiling outlet instead of three, which simplifies the wiring and the plaster work. They suit contemporary kitchens with handleless cabinetry and a strong horizontal run. If your island is a social hub with stools along one side, a linear fitting keeps the light continuous down the whole seating length rather than leaving one diner in shadow.
You can browse both formats across the niori lighting collection to compare how a run of individual fittings reads against a single linear piece before you commit the wiring positions. Whichever route you take, these are the best pendant lights for kitchen use only when the placement has been settled first.
Where Alabaster and Stone Soften a Hard Island Run
Kitchen islands are hard-edged by nature: stone worktops, straight cabinet lines, metal taps and appliances. Lighting is the easiest place to introduce a material that pushes back against all that geometry. Alabaster pendant lights over a kitchen island do this quietly. Because the stone is genuinely translucent, light travels into it and comes back out softened, with the fine natural veining showing as a warm map inside the shade. It reads as substance rather than decoration.
The alabaster lighting range at Niori is built around this quality. Over an island, a pair of alabaster fittings gives you a glow that flatters food, hands and faces at the same time, which is more than a glass shade or a metal cone will do. Marble and onyx behave similarly, with onyx carrying more dramatic colour banding when lit. Alabaster is a form of gypsum and softer than granite, so it wants gentle handling; the Natural Stone Institute is a sensible reference on how these stones differ in hardness and care.
A practical note from the studio: we shipped a pair of alabaster kitchen island pendant lights to a client with a dark marble island, and the thing that surprised them was how the stone shades warmed the whole worktop after sunset. The same island under bare downlights had felt clinical. Material choice does real work here, not just styling.
Warm-White Bulbs and Dimming
An island has to be two rooms in one: a bright prep zone at eight in the morning and a relaxed gathering spot at eight at night. Bulb colour and dimming carry that shift for pendant lights over a kitchen island. Choose warm-white bulbs in the 2700K to 3000K range. Cooler light photographs cleanly but feels hard over food; 4000K reads as neutral and works if you prefer a crisper prep light, which is why some fittings are offered in that temperature.
Put the island fittings on their own dimmer, separate from the downlights. That way you can hold your kitchen island pendant lights low and warm for dinner while nudging the general light down to match. Confirm the bulbs and driver are dimmable and pair them with a compatible dimmer; mismatched dimmers cause flicker and buzz. For anything beyond swapping a bulb, use a qualified electrician for the wiring and switching.
Quick Buyer Checklist
Measure the island length before choosing a count. Two for most, three for long runs.
Set drop height to 30 to 36 inches (76 to 91cm) above the worktop, adjusted for ceiling height.
Space fittings so their light pools overlap; use thirds for two, quarters for three.
Consider a linear fitting for long, narrow islands or low ceilings.
Choose a diffusing material like alabaster to cut glare and warm the light.
Specify 2700K to 3000K warm-white, dimmable, on a separate circuit from the kitchen ceiling lights.
Fix positions at first-fix wiring, not after the ceiling is closed up.
Placement is the part of pendant lights over a kitchen island you cannot undo cheaply, so it deserves the most thought. Once the count, height and spacing are settled, the fitting itself becomes the enjoyable decision. Explore the range from the Niori homepage when you are ready to match a material to your island.