
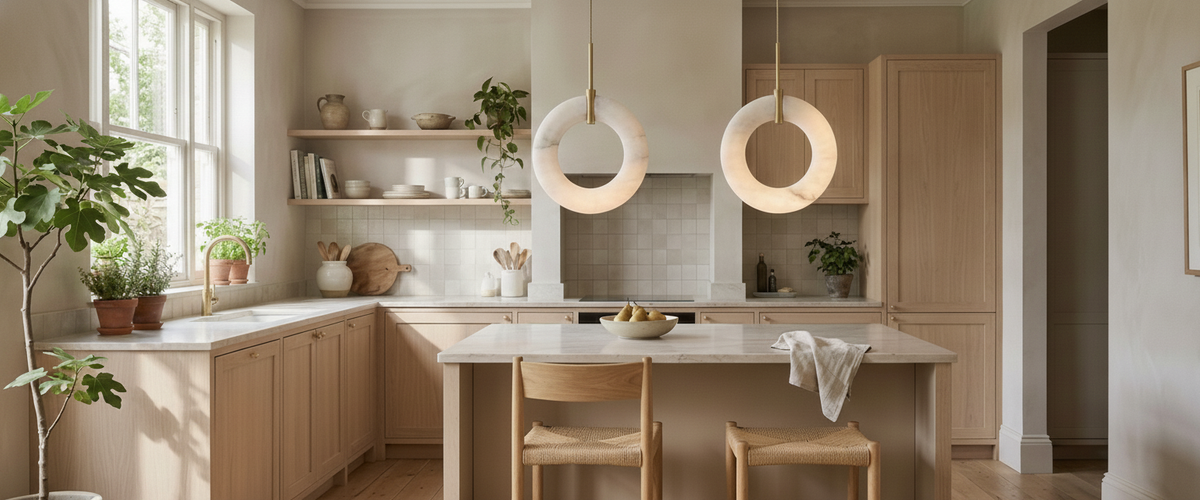

The island is the one part of the kitchen everyone actually looks at. Cabinets fade into the walls, the hob does its job and disappears, but the island sits in the middle of the room asking to be dressed. Get the kitchen island lighting wrong and the whole space feels either dim and functional or cluttered and fussy. Get it right and the island reads as a centrepiece, the way a dining table does under a good chandelier.
That is why stone pendants have become the go-to for this spot. Alabaster and marble diffuse light in a way frosted glass never quite manages, giving a warm, low-glare glow over a surface people cook at, work at, and lean on for hours. The trick is treating kitchen island lighting as a lighting design problem first and a decorating one second.
A pair of alabaster pendants turns a working island into a centrepiece.

Quick Answer: Kitchen Island Lighting at a Glance
Count: One pendant per 60cm to 90cm of island length, so most islands take two or three.
Height: Hang the bottom of the pendant 75cm to 90cm (about 30in to 36in) above the worktop.
Spacing: Space pendants evenly along the island's centre line, not the ceiling's, with equal gaps at each end.
Light quality: Stone pendants give a beautiful ambient glow but often need help from downlights for genuine task light.
Layers: Pendants for atmosphere, ceiling downlights for coverage, under-cabinet strips for the worktops behind you.

Why the Island Reads as a Centrepiece the Rest of the Kitchen Doesn't
Perimeter cabinets are designed to recede. The island is the opposite. It floats free in the room, visible from the hallway, the dining area, and often the living space in an open-plan layout. Whatever hangs above it becomes the first thing a guest notices when they walk in, which is why kitchen island lighting carries more weight than any other fixture in the room.
This is where alabaster earns its keep. A run of downlights over an island lights the surface but leaves the air above it dead. A pair of carved stone pendants fills that gap with soft, warm illumination and gives the eye something to settle on. Recessed spots alone light the counter but leave the room feeling like a work zone rather than somewhere to sit; two alabaster pendants over the island can change that on their own, with nothing else in the room moving.
Because the island is so exposed, the fixture doubles as sculpture during the day when the lights are off. Natural stone has an advantage here. Each piece carries its own veining and translucency, so an unlit alabaster pendant still reads as an object worth looking at, not a dark glass bowl waiting for dusk. You can browse the range of alabaster lighting to see how different carving and stone patterns change that daytime presence.
Counting Pendants and Spacing Them to Your Island Length
Start with a tape measure, not a wish list. Good kitchen island lighting follows the island, not your taste. As a working rule, allow one pendant for every 60cm to 90cm of island length.
Islands up to around 1.2m: a single larger pendant or a compact pair.
Islands around 1.5m to 2m: two pendants, or a three-light island fixture on one canopy.
Islands over 2.4m: three separate pendants or a linear multi-light suspension.
For spacing, measure the full length of the island top and mark its centre point. If you are hanging three pendants, place one on centre and the other two equally spaced either side, leaving a margin of roughly a quarter of the island length at each end. Two pendants divide the length into thirds, sitting one third and two thirds along. The gaps should look deliberate from every angle, because in an open-plan room your kitchen island lighting will be seen from every angle.
Three-light island pieces sold on a single canopy take some of this maths away, since the spacing is fixed by the maker. Where a mid-length island of 1.5m to 2m wants coverage without three separate outlets chased into fresh plaster, a fixed three-light run such as the Emery 3 Light Island Pendant settles the spacing for you. For a longer island that needs more points of light across its length, a five-light piece like the Taiko 5 Light Island Pendant spreads the glow further than a compact pair would. Separate pendants give you more control over the kitchen island lighting but demand more careful marking out before the electrician commits.
Mark the island centre line first, then space the pendants evenly along it.
The Hanging Height That Clears Sightlines Yet Still Lights the Surface
Hang too high and the pendants float away from the island, lighting the ceiling more than the worktop. Hang too low and you block the view across the room and leave guests staring at the underside of a shade while they talk to you. The sweet spot for most kitchen island lighting is 75cm to 90cm (roughly 30in to 36in) between the worktop and the bottom of the pendant.
A few things shift that range. Taller ceilings can carry a little more height without the pendants looking marooned. Very tall cooks, or an island used as a breakfast bar with stools, usually want the higher end so nobody sitting down catches a face full of glow. Wider stone pendants sit a touch higher than slim ones, because the shade itself occupies more of the sightline.
One lesson worth passing on: always check the height with someone standing on the far side of the island, not just from where you are working. The person opposite is the one whose eyeline the pendant can spoil. Mock the height up with a cardboard cutout on a string before the electrician sets the drop. It costs nothing and saves a re-hang.
Stone Pendants Over an Island: Warm Glow Versus Real Task Light
Here is the honest part most kitchen island lighting guides skip. Alabaster and marble pendants are chosen for atmosphere, and they are brilliant at it. The stone softens the source and throws a warm, even wash that flatters food, faces, and the worktop itself. What they do not always do is deliver the crisp, directional light you want when you are chopping over a dark granite top.
That is not a fault; it is the whole point of diffusion. Solid stone absorbs and scatters light rather than firing it straight down. So think of your stone pendant lights as the ambient layer that makes the room feel good, and plan a separate source for precise task light. Trying to force one alabaster pendant to do both usually ends in a shade that is overbright and glary up close while still leaving shadows on the surface.
Bulb choice helps you tune the glow. Warm white LEDs in the 2700K range keep stone reading honey-warm rather than clinical. Put the kitchen island lighting on a dimmer so the island can drop from working brightness to a low evening setting when the kitchen turns into a place to sit and drink wine. The Chartered Institution of Building Services Engineers publishes guidance on appropriate light levels for domestic and working spaces if you want a benchmark for how bright the overall kitchen should be before you start layering.
Layering Pendants Against Kitchen Ceiling Lights and Under-Cabinet Strips
A kitchen that only has pendants over the island is under-lit everywhere else. A kitchen that only has recessed kitchen ceiling lights is flat and characterless. The best kitchen island lighting runs three layers together.
Ambient layer (the pendants): your stone island pendants set the mood and light the centre of the room. On a dimmer, always.
Task layer (downlights and under-cabinet): recessed ceiling lights cover the walkways and the island edges the pendants miss, while under-cabinet LED strips light the perimeter worktops where you actually prep.
Accent layer (optional): a wall light, a lit shelf, or a low-level plinth strip for late-night moments when you want a glow without flooding the room.
Wire these on separate circuits so you can run the pendants alone in the evening and bring the downlights up only when you are cooking. A single switch for everything wastes the whole exercise. Any of this rewiring should go to a qualified electrician; kitchen island lighting in particular involves a ceiling outlet directly over a work surface, and that is not a job for guesswork. Electrical safety guidance from Electrical Safety First is a sensible read before you brief the trade.
Finish matters here too, since the metalwork is what ties the pendants to the rest of the room. A warmer tone like the Emery in Weathered Brass sits comfortably against oak and darker cabinetry, while a cooler nickel or silver reads better in a paler, more contemporary kitchen. If you are still weighing pendant lights for kitchen use against a flush ceiling light for the whole room, or wondering whether the island wants pendants at all, the full lighting collection sets pendants, chandeliers, wall lights, and ceiling fixtures together so you can judge scale and finish before you commit the ceiling to a drilling plan.
A Short Buyer's Checklist Before You Order
Measured the island length and worked out pendant count at one per 60cm to 90cm.
Confirmed ceiling height and set a drop that lands 75cm to 90cm above the worktop.
Checked the sightline from the far side of the island, not just the cook's side.
Decided whether you want separate pendants or a single multi-light island canopy.
Planned a task layer (downlights, under-cabinet strips) so the stone pendants can stay atmospheric.
Specified 2700K warm-white LEDs on a dimmer, on their own circuit.
Booked a qualified electrician for the ceiling outlet and switching.
Do that groundwork and the stone does the rest. Alabaster and marble reward this kind of planning because their glow is the reason you chose them; give them room to be the ambient layer and let downlights handle the hard work, and your kitchen island lighting becomes exactly the centrepiece the rest of the kitchen never quite is.
Budget for kitchen island lighting depends on the stone, the number of lights, the size of the piece, and the finishing on the metalwork, so it is worth requesting a tailored quote rather than guessing from a headline figure. A three-light natural-stone island pendant is a different proposition from a single small shade, and the price should reflect that.