
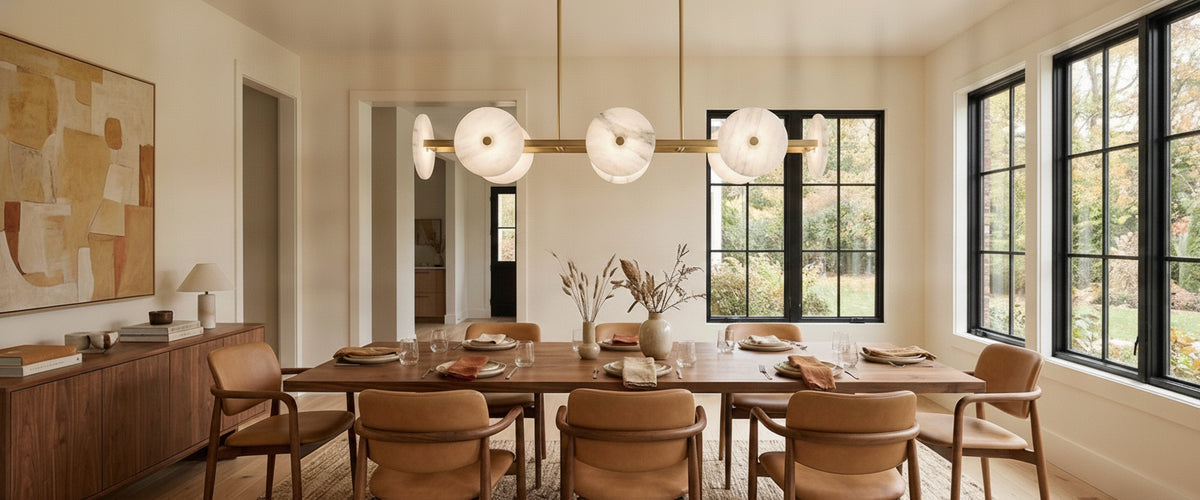

Hang three separate pendants over a long dining table and you will spend the next decade looking at the gaps between them. A brass linear chandeliers settles the argument: one rod, one axis, one continuous run of light down the centre of the table. It is the most disciplined way to light a long surface, and it is also the least forgiving, because a horizontal bar shows every error in alignment, span and drop height that a cluster of round pendants would happily hide.

At a Glance
- Size the brass linear chandelier to the table, not the room. Aim for a rod roughly two-thirds to three-quarters of the table or island length.
- Brushed brass is the safest finish in a working kitchen; polished brass rewards a formal dining room and punishes fingerprints.
- Drop height shifts with use. Lower over a dining table where nobody stands, higher over an island where people work and reach.
- Bulb spacing controls the pool below. Widely spaced lamps scallop; a continuous alabaster panel gives one even band of light.
- Alabaster softens what brass sharpens, which is why so many linear pieces pair the two.
- Budget depends on stone selection, span, metalwork and driver quality, so ask for a tailored quote rather than assuming a bracket.

What a Brass Linear Chandelier Does Over a Long Table
Brass behaves differently depending on the shape it is wrapped around. On a round pendant it reads as a warm accent, a small glint. Stretch it along a metre and a half of horizontal rod at eye level and it becomes a line in the room, closer to architecture than to a decorative object. That line does useful work: it draws the eye along the table, reinforces the axis of the room, and gives a long open-plan space a spine.
It also amplifies the colour temperature of the brass itself. Warm metal running parallel to a walnut or oak tabletop can tip the whole scheme amber, which is lovely in a low-lit dining room and less lovely at eight in the morning over a marble island. Pairing the rod with translucent stone is the corrective. Alabaster panels throw a soft, slightly cream light that reads as daylight-adjacent rather than candlelit, so the brass stays warm without the room turning orange. That balance is the reason nearly every brass linear chandelier in the Niori range sets metal hardware against stone diffusers rather than clear glass.
Polished, Brushed and Antique Brass: Which Finish Survives Close Inspection
People stand much closer to a brass linear chandelier than they think. At a dining table, the rod sits roughly at the eye level of anyone standing, so the finish is inspected from about a metre away, several times a day.
Polished brass is mirror-bright and directional; it picks up candle flames and window light beautifully. It also shows fingerprints, and anyone reaching across the table to pass a dish will touch it. In a formal dining room used a few evenings a week, that is a fair trade.
Brushed brass has a fine directional grain that scatters reflections instead of returning them. Marks disappear into the texture. Over a kitchen island, where steam, hands and cooking oils are part of daily life, brushed is the finish we specify most often and the one that still looks correct after five years. Where the metalwork is close enough to touch daily, a brushed-finish rod such as the Elvaris LED Linear Alabaster Chandelier in brushed brass ages more gracefully than a mirror-polished equivalent.
Antique or aged brass is darker, with a deliberately uneven patina. It suits old buildings, panelled rooms and limewashed walls, and it hides the small tonal shifts brass develops naturally over time. Be aware that ageing is applied by hand, so two pieces will never be identical; on a long rod, any variation runs the length of the fixture rather than hiding on a curve.
Ask one question before committing: is the brass solid, plated or lacquered? A lacquered finish holds its colour but can eventually wear at touch points. An unlacquered surface will develop a patina, which some buyers want and others do not expect. Conservation guidance on the care of copper alloys from the Canadian Conservation Institute is a sensible primer on why abrasive polishes are the wrong answer for a coated fixture.
Match the Rod Length to the Table Span, Not the Room
This is where most linear specifications go wrong. Buyers measure the room, decide it is large, and order the longest brass linear chandelier available. Then the fixture overshoots the table at both ends and the light spills onto the chairs instead of the plates.
The proportion that works: the illuminated span should sit somewhere between two-thirds and three-quarters of the tabletop length, centred on the table. A 2.4m (roughly 8ft) table wants something in the region of 1.6m to 1.8m of fixture. Leave at least 15cm (6in) of clear tabletop beyond each end of the rod so the piece reads as deliberate rather than crammed. Smaller tables are where restraint pays: over a 1.6m to 1.8m table, a metre-scale run like the Oria LED Linear Alabaster Chandelier at 1.2m keeps the proportion honest, where a longer bar would simply hang over the chairs.
Two other measurements matter. Table width sets the maximum sensible fixture width; a slim rod over a wide table can leave the outer edges dim, which is where a second row of downlights or a pair of wall lights earns its place. Ceiling height sets what you can get away with visually. Under 2.4m (8ft), a slim profile keeps the room breathing. Above 3m, a deeper body or a panelled form stops the fixture looking like a stripe floating in space.
One hard-won lesson from the studio: measure where the ceiling outlet actually is before you order. We shipped a brass linear chandelier in brushed metal and alabaster to a converted barn in Suffolk where the electrician had positioned the outlet from the original ceiling rose, about 40cm off the centreline of the new table. The fixture was perfect; the alignment was not. Off-centre feed points are fixable with a canopy extension or a discreet track, but they need to be flagged before manufacture, not after delivery.
How Bulb Spacing Shapes the Pool of Light Below
A brass linear chandelier is really a light distribution decision dressed as a decorative one. Individual lamps spaced along a rod produce scallops: bright pools under each source, softer valleys between. The wider the spacing and the higher the drop, the more visible that rhythm becomes. Over a long refectory table it can look intentional and rather handsome. Over a worktop where you are chopping, it means one hand works in shadow.
Continuous alabaster panels do the opposite. The stone diffuses each source across its full width, so the underside reads as one soft band with no hot spots. That is the quality most people are actually buying when they choose a stone-fronted brass linear chandelier: even light, no glare in the eye of the person opposite, and no reflected dazzle bouncing off polished stone below. Where a working island needs one uninterrupted band rather than a rhythm of pools, a panelled body such as the Lunaro Linear Panel Alabaster Chandelier is closer to the right design language than a row of exposed lamps.
On dimming, decide early. LED modules integrated into a linear body need a compatible dimmer and driver combination, and mismatches show up as flicker or a hard cut-out at the bottom of the range. Warm-dimming modules that shift towards amber as they lower are worth considering for dining rooms; they behave more like candlelight through alabaster. Professional lighting guidance, including the technical material published by CIBSE, treats dining and food preparation as separate tasks with different light level requirements, which is exactly why a single unswitched circuit rarely satisfies both in an open-plan kitchen. Always have final connection carried out by a qualified electrician.
Drop Height: Over Food Versus Over Stone Worktop
The usual advice, 76cm to 90cm (30in to 35in) above the tabletop, is a starting point rather than an answer. Refine it against three things.
Over a dining table, nobody stands underneath, so you can hang the brass linear chandelier low. Lower drops make the light feel intimate and keep glare below eye level for people walking past. If a mirror or artwork sits on the far wall, sight lines across the room matter more than the numbers.
Over an island or stone worktop, go higher, typically towards the top of that range or slightly above, because people stand, lean and reach. Polished marble and quartz are reflective; a fixture hung too low will appear as a bright smear in the surface every time you look down. A matte or honed worktop is far more forgiving.
Over a console or a run of cabinetry, judge by the object beneath rather than the floor. Consistency along a sight line reads better than mathematical accuracy.
Panelling, Limewash and Raw Plaster: Where the Linear Form Sits Best
A long horizontal fixture is a strong graphic element, so the wall finish behind it does half the work. Against painted panelling, the rod picks up the vertical rhythm of the stiles and creates a pleasing cross-grid; keep the brass tone in conversation with the ironmongery already in the room. Limewash and clay paint have a chalky depth that absorbs light rather than bouncing it, which flatters warm brass and makes alabaster glow look richer by contrast. Raw or polished plaster is the toughest partner because it is unforgiving of colour clashes; cooler plaster tones can make yellow-toned brass look brash, so brushed or aged finishes usually sit better.
In minimal rooms with no mouldings at all, a brass linear chandelier supplies the only line in the space, and that is a strong argument for a piece with real material presence. Browsing the wider alabaster lighting collection alongside linear options is the quickest way to see how differently stone reads against a flat white wall compared with a textured one.
Buyer's Checklist Before You Order a Brass Linear Chandelier
- Measure the tabletop or island length and width, then calculate two-thirds and three-quarters of the length as your target span.
- Confirm the position of the existing ceiling outlet relative to the true centreline of the table.
- Check joist direction and ceiling construction; a long fixture may need fixings at two points rather than one.
- Decide the brass finish by how the room is used, not only by how it photographs.
- Confirm whether the light source is integrated LED or replaceable lamps, and which dimmer is compatible.
- Check colour temperature. Around 2700K keeps alabaster warm; higher values can make natural stone look grey.
- Ask whether stone panels are individually selected, since veining varies from block to block.
- Ask for a quote based on your span, finish and installation conditions rather than assuming a standard price.
Living With Brass and Alabaster
Maintenance is undramatic if you start correctly. Dust the rod along the grain with a dry microfibre cloth; on brushed finishes, working across the grain leaves faint marks that catch the light. Skip proprietary metal polishes on lacquered brass entirely. For alabaster panels, dry dusting is the default, and any damp cleaning should be minimal and immediately dried, because gypsum alabaster is soft and porous and reacts badly to standing moisture. Never use vinegar, bleach or acidic sprays anywhere near the stone.
Above a hob or a busy island, expect a fine film of cooking residue on the underside of a brass linear chandelier over time. A slightly damp cloth on the metal, dried at once, handles it. Isolate the circuit before touching the fixture, and let an electrician handle anything beyond surface cleaning.
Chosen well, a brass linear chandelier stops being a light fitting and becomes the datum line of the room. Get the span right, get the drop right, let the stone do the diffusing, and the fixture will look as considered in ten years as it does on the day the scaffolding comes down. If you are weighing a linear piece against a cluster or a statement chandelier, it is worth walking the full niori lighting range first to see how each form handles a long surface.