
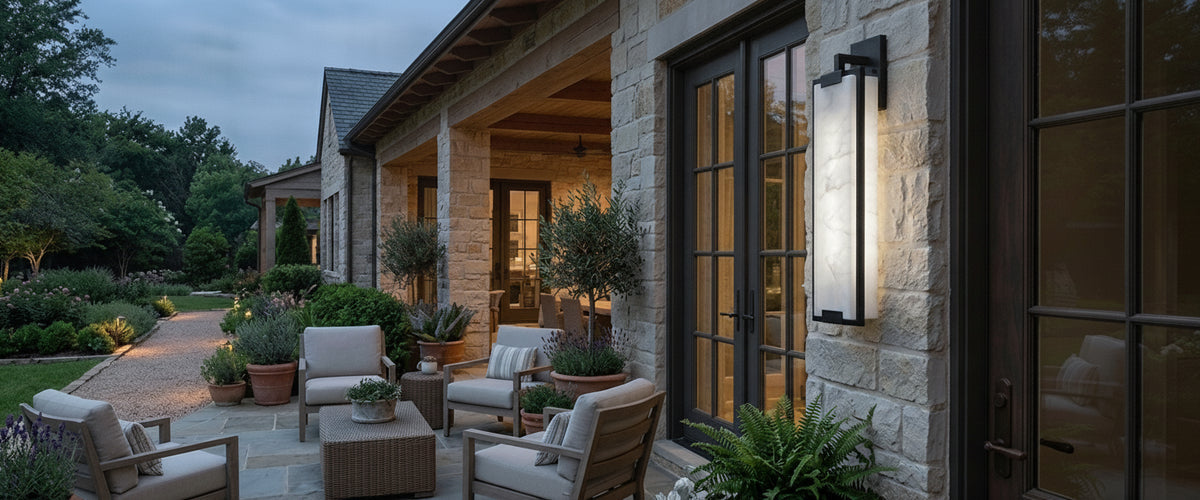

Most garden paths are over-lit and under-designed. Walk an average outdoor garden pathway after dark and you will meet a line of identical mushroom lights throwing hard white circles onto gravel, with the planting behind them reduced to a black wall. The path is technically visible. The garden has vanished. A good outdoor garden pathway scheme does the opposite: it gives you just enough information to place your feet, then spends the rest of its energy making the borders, hedges and steps read as depth rather than darkness.

At a Glance: What Actually Works
Fewer, better fixtures. Three well-aimed lights along an outdoor garden pathway beat eight cheap ones every time.
Aim for guidance, not illumination. Roughly 30 to 100 lumens per path fixture is usually plenty; bollards can run a little higher.
Warm color temperature. 2200K to 2700K keeps foliage looking green rather than gray.
Space by rhythm, not by ruler. Around 6 to 10 ft (1.8 to 3 m) apart on straight runs, tighter on curves and at every change of level.
Shield the source. If you can see the LED from standing height, the fixture is wrong or badly angled.
Buy for the weather. Solid brass, marine-grade 316 stainless steel, copper or properly powder-coated aluminium, with an IP rating suited to where the fixture sits.
Alabaster stays under cover. It is a beautiful material for porches, loggias and interiors, and a poor one for the open ground of an outdoor garden pathway.

Ground Stakes, Bollards and Flush Lights: What Each One Does to the Dark
Search for "garden pathway lights outdoor" and you get a wall of near-identical spikes, which hides the fact that the three main fixture families do genuinely different jobs on an outdoor garden pathway. Mixing them badly is why so many schemes look busy.
Spike or Stake Path Lights
These sit 12 to 24 in (30 to 60 cm) above the soil and cast a soft pool downward and outward. They are the most forgiving option because you can move them once planting fills in, which it always does faster than the drawing suggested. Look for a deep shade or cowl that hides the lamp completely from a standing viewer. The cheap ones use a shallow disc, which means the light source is visible from halfway down the garden.
Bollards
Taller, more architectural, and better suited to a wide outdoor garden pathway approach, a driveway edge or a formal courtyard. A bollard at 24 to 36 in (60 to 90 cm) throws a broader circle, so you need fewer of them. The trade-off is presence: bollards are objects in the garden during daylight, so material and finish matter far more than they do with a low stake light half-buried in lavender.
Flush and In-Ground Fixtures
Recessed uplights and flush markers give the cleanest daytime result because they disappear. They also demand the most planning, because you are committing to a position before the path is laid, and they need drainage beneath them or they become small ponds. Use them where the surface is hard and level, and where you want the path edge implied rather than announced. On a stone terrace, an evenly spaced line of flush markers reads as a runway, so break the rhythm deliberately.
Spacing Logic for Straight Runs, Curves, Gravel and Steps
Even spacing is the default and it is usually wrong. On a straight outdoor garden pathway run, alternating sides at 8 to 10 ft (2.5 to 3 m) creates overlapping pools and a sense of movement, while a single-sided run at the same interval feels like an airfield. On curves, tighten the spacing on the inside of the bend and let the outside stretch; the eye follows the closer lights and reads the curve correctly.
Gravel behaves differently from stone or brick, and it changes how an outdoor garden pathway takes light. It scatters light rather than reflecting it cleanly, so a fixture that looks correct on a slab path can seem underpowered on self-binding gravel. Test one before you buy the set. Changes of level are the only place worth over-lighting rather than under-lighting: put a fixture at the top and the bottom of every flight, and consider low recessed lights within the risers themselves so the tread edges catch light and the steps read as steps.
One more spacing habit worth stealing from designers: leave gaps on purpose. A stretch of unlit outdoor garden pathway between two lit sections gives the eye a rest and makes the next pool of light feel intentional. Continuous illumination flattens everything.
The Lumen Sweet Spot for Outdoor Garden Pathway Lights
Domestic gardens need far less output than most people buy. Once your eyes adapt to darkness, 30 to 100 lumens per path fixture is enough to show a change in surface and an obstacle. Bollards lighting a wider approach might sit somewhere between 100 and 200 lumens. Anything beyond that and you are bleaching the planting, killing your night vision and forcing every subsequent fixture to work harder to compete.
Color temperature does as much work as brightness on an outdoor garden pathway. Stay at 2700K or below. At 3000K and above, green foliage turns towards gray and stone loses its warmth. If your fixtures are dimmable, wire the run to a single dimmer and set it low; you can always lift it for a party. Beam angle matters too. A narrow 15 to 25 degree beam gives a tight, controlled pool, while a wide flood scatters light across the borders indiscriminately, which is exactly what you are trying to avoid.
The Institution of Lighting Professionals publishes useful guidance on limiting obtrusive light and spill into neighboring properties, worth reading before you specify anything that sits above head height. Their guidance notes on obtrusive light are written for professionals, but the principles translate directly to a domestic garden.
Mains, Low Voltage or Solar: An Honest Account
Mains (230V) gives you consistent output along a long outdoor garden pathway, longer cable runs and the widest choice of serious fixtures. It also means armoured cable, correct burial depth and certified work. Any fixed outdoor electrical installation in a UK garden should be designed and installed by a qualified electrician working to the current wiring regulations. This is not a weekend project.
Low voltage (12V) is the sweet spot for most outdoor garden pathway schemes. A transformer sits in a protected position and feeds a cable run that is safer to work with and easier to extend later. Fixtures are typically smaller and better shielded, connections are made with waterproof plugs, and you can add or move lights as planting matures. Voltage drop over long runs is the thing to watch; a good supplier will size the transformer and cable for you rather than selling you a kit and wishing you luck.
Solar is honest about one thing and dishonest about another. It genuinely removes the cabling problem. It also depends on the British winter delivering usable daylight, which it reliably fails to do between November and February. Solar path lights work best as a supplementary layer on a south-facing outdoor garden pathway in summer, or in a garden where no cable route exists. Judge them on battery capacity and panel size, not on the lumen figure printed on the box.
Finishes That Stay Sharp After a British Winter
Corrosion is the reason most outdoor garden pathway schemes look tired within three years. Solid brass and copper both weather to a patina that improves with age and will outlast almost anything else in the garden. Marine-grade 316 stainless steel holds up well, including near the coast, where lesser grades pit and stain. Powder-coated aluminium is lighter and cheaper, but the coating is the whole defence; one deep scratch from a strimmer and the corrosion starts underneath.
Check the IP rating against the actual position. A fixture in a border that occasionally floods needs more protection than one on a raised terrace. Gaskets and cable glands are the parts that fail first, so buy fixtures where seals can be replaced rather than sealed units that become disposable.
Natural stone outdoors is a separate conversation. Granite and basalt handle frost cycles well. Softer stones absorb water, and when that water freezes and expands, the surface spalls. Historic England's technical advice on building materials and weathering explains the mechanism clearly, and it is worth understanding before you commit a stone fixture to an exposed spot beside an outdoor garden pathway.
Where Alabaster Fits in an Outdoor Garden Pathway Scheme
Alabaster is gypsum. It is soluble in water, and no amount of sealing makes it a genuinely exterior material. We have had this conversation more than once with clients who wanted a stone pendant hung over an open pergola, and the honest answer is always the same: the piece will suffer.
What alabaster does brilliantly is anchor the sheltered end of the route. A covered porch, a loggia, a glazed garden room or a deep entrance canopy will take an alabaster pendant or wall light beautifully, and the warm diffused glow it produces is far softer than any exterior fixture can manage. That glow becomes the destination your outdoor garden pathway is walking towards. The path lights guide; the alabaster piece at the door does the welcoming. If you are choosing that anchor piece, browse the alabaster lighting collection and look for something with visible veining, because backlit veining is the detail that reads from twenty paces down a dark garden.
The same logic applies to what people see through the windows. Warm interior lighting at 2700K, glimpsed from the garden, ties the whole scheme together. A marble table lamp on a hall console or an onyx wall light in a stairwell will do more for the view from outside than another spike light in the border. Our wider lighting range is worth browsing with that in mind.
The Glare Mistake Most Pathway Schemes Make
Here is the single biggest fault in domestic garden lighting: the light source is visible. A bare LED at knee height destroys your night vision, so the rest of the garden goes black and the outdoor garden pathway looks darker than it actually is. Every fixture should be shielded, cowled or angled so that from a standing position at roughly 5 ft 3 in to 6 ft (1.6 to 1.8 m), you see the pool of light and not the lamp.
Fix it by tilting spike lights slightly away from the direction of approach, choosing deeper shades, adding snoots or louvers to fixtures that accept them, and recessing wall-mounted lights so the lamp sits behind the front face. Then do the test that matters. Walk the outdoor garden pathway in both directions, at night, before you fix anything permanently. Schemes that look perfect on paper regularly fail in one direction of travel.
Pathway Lighting Checklist
Walk the outdoor garden pathway at night with a flashlight and mark where you actually hesitate.
Decide the fixture family: stakes for flexible planting, bollards for wide formal approaches, flush for hard level surfaces.
Set spacing by rhythm, alternating sides and tightening on curves and steps.
Cap output at around 100 lumens per path fixture and stay at 2700K or below.
Choose low voltage unless there is a specific reason not to; use a qualified electrician for any mains work.
Specify brass, copper, 316 stainless or well-coated aluminium, with replaceable seals.
Shield every source so the lamp is invisible from standing height.
Put the warm alabaster or stone piece under cover at the destination, not out in the weather.
Wire the run to one dimmer and set it lower than feels right at first.
Rewalk the path in both directions before committing to final positions.
Care Through the Seasons
Clean lenses twice a year, before autumn and again in early spring; a film of algae cuts output more than most people expect. Check that spike lights along the outdoor garden pathway have not been pushed out of alignment by frost heave or an enthusiastic gardener. Re-grease cable glands if the manufacturer recommends it. For sheltered alabaster and marble pieces, dust with a dry soft cloth and keep water and cleaning sprays well away from the stone, since moisture is what marks these surfaces permanently.
Niori works in alabaster and natural stone, so our contribution to a garden scheme usually sits at the threshold rather than along the border. The best results we see come from projects that treat the two as one design: restrained, well-shielded fixtures along the outdoor garden pathway, and a single warm stone piece at the door that makes the whole walk feel like it was leading somewhere.