Introduction
Brick lights are compact, recessed outdoor fixtures designed to sit flush within hard surfaces like retaining walls, stair risers, planters, and masonry boundaries. Their slim profiles integrate seamlessly into the architecture, offering a streamlined, built-in aesthetic that’s far less intrusive than surface-mounted fittings. Whether lining a pathway, embedded in a staircase, or accenting landscape features, brick lights deliver discreet, low-level illumination that enhances both form and function.
Unlike traditional bollards or spike lights, brick lights are engineered to disappear by day and come alive at night, guiding movement, defining edges, and accentuating textures. Their purpose is twofold:
Enhanced safety: reducing trip hazards in high-traffic areas
Subtle ambient lighting: elevating the outdoor experience
To unlock these benefits, careful positioning is essential. Even beautifully crafted fixtures can fall short if they’re poorly placed, overused, or mismatched to surrounding materials. This guide focuses on strategic placement, practical LED advice, common mistakes to avoid, and expert tips to make brick lighting perform beautifully.

Design-LED Placement for Better Performance and Visual Balance
Outdoor lighting success comes from thoughtful integration, not just installation. Poor placement of recessed fittings can cause glare, uneven illumination, visual clutter, or ineffective lighting zones.
Common placement challenges
overcrowding confined areas
inconsistent alignment
mounting fixtures too high or too low
Design objective
Well-placed brick lights should:
guide movement without dazzling eyes
create consistent visual rhythm
support architectural lines and landscape features

Where to Install Brick Lights for Best Results
Steps and Staircases (Essential Safety Zone)
Steps are among the most critical areas for brick lights, because even subtle shadows can create hazards.
Best placement rules:
Install into vertical risers, not on tread surfaces (avoids glare).
Height: ~100-150mm above the step below.
Spacing: typically 1 light every 2-3 risers, depending on step width and fixture brightness.
This approach prevents trips and visually defines each step, especially when paired with railings or landscape edging.
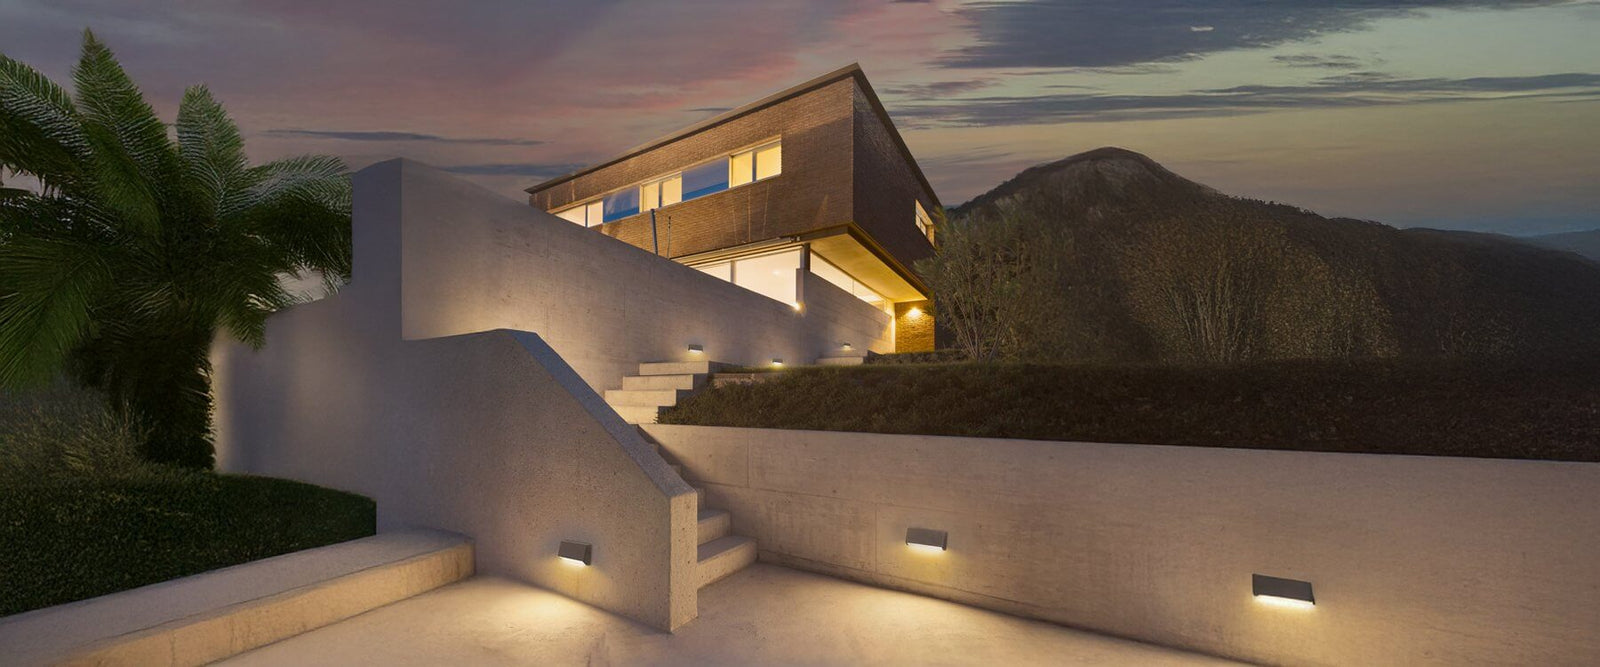
Driveways and Walkways
Brick lights installed along retaining edges or low boundary walls add structure and visual rhythm to driveways and garden paths. They’re ideal for creating a soft edge glow that guides movement without overwhelming the space.
Placement tips:
Choose IP65+ rated fixtures to withstand outdoor exposure.
Use symmetrical runs for straight driveways.
Consider staggered or corner placements for winding garden paths.
Pair with bollards or low post lights for layered, safe lighting.
Retaining Walls and Planters
Brick lights in low retaining walls define garden beds or terrace transitions. Their soft glow draws attention to texture and depth especially effective in dry-stacked stone or exposed brickwork.
Best practice:
Mount at foot level: ~200-300mm from ground for intimacy and minimal glare.
Combine with uplights or garden spikes to highlight foliage or sculptural features.
Entrances and Perimeter Walls
Brick lights can act as subtle navigational cues near:
gates and side access routes
address plaques
perimeter fences or pillars
Design tips:
Place fixtures near access points to assist wayfinding after dark.
Use symmetrical layouts along fences to create a soft perimeter glow.
Pair with wall lights or pendants to illuminate entry zones more fully.

How Far Apart Should Brick Lights Be?
Spacing depends on fixture output, beam angle, and desired effect. Too sparse and the light feels disconnected; too dense and it becomes visually noisy.
General rule of thumb
1-1.5 metres apart for walls and paths with linear runs.
Specific guidelines
Steps: base on symmetry and step width first, then adjust brightness.
Walkways: aim for approx 200- 400mm from ground for best effect.
Pro tip: Mock up placements using temporary fittings or a digital layout tool before final installation to avoid permanent errors.

Blending Fixtures into Brick, Stone, or Rendered Walls
ntegration begins with finish, profile, and light colour. The goal is for brick lights to feel like a natural material extension, not an interruption.
Surface finishes
Match: bronze on brown brick, graphite on dark render, stainless steel on pale stone.
Contrast: black or brushed brass against light surfaces for architectural flair.
Profile choices
Slimline and frameless: ideal for smooth, contemporary walls.
Framed or louvered: suited to textured or traditional walls and helps diffuse light.
Colour temperature matters
Warm white (2700-3000K): perfect for patios, garden lounges, and social zones.
Neutral white (3500-4000K+): suits driveways, utility walks, and areas where clarity matters.
Warm light enhances surface materials and feels inviting a key reason designers choose it for social zones.

LED-Specific Guidance (Expert Add-On)
Most brick lights today use LED technology, and the right choices improve performance and eye comfort dramatically.
LED quality tips
Choose fixtures that are:
Dimmable where possible
Flicker-free drivers
High CRI (90+) for true colour rendering
Compatible with control systems (photocell, timer, smart)
Beam angles & diffusion
Narrow beams for accenting textures
Wide beams for even walk-way coverage
Diffusers or louvers reduce glare on eye lines
This helps ensure your brick lights feel soft instead of harsh.

Combining Brick Lights with Spotlights, Bollards & Wall Lights
These recessed units play a specific role within a larger lighting scheme. Use them for low-level definition, and complement them with other fixtures for hierarchy and drama.
Spotlights: for accenting foliage or architecture
Bollards: for vertical presence in open zones
Wall lights: to wash down facades or anchor patio zones
Zoning your space using layers adds depth and usability. This approach creates distinction between circulation routes and gathering areas while enhancing the overall atmosphere.

Common Placement Errors with Brick Lights
Even the best fixtures can fall flat if they’re installed without a clear strategy. To avoid an awkward or inefficient setup, it’s important to consider not just how many brick lights you need, but exactly where and how to place them. Here are the most frequent mistakes that compromise both aesthetics and performance:
Overcrowding small spaces: Using too many fixtures in tight areas overwhelms the design, flattens contrast, and eliminates the subtlety that makes brick lights effective in the first place.
Mounting too high on vertical surfaces: When placed above the recommended height, brick lights can cast glare directly into the eyes, especially on walkways or near entrances. Keep them closer to foot level unless you're lighting tall features.
Installing too close to seating or window zones: Without shielding or louvered designs, the beam can cause discomfort. This is especially problematic near patios, outdoor lounges, or garden seating areas.
Neglecting wiring and access planning: Recessed lights require back-end conduit or cavity space. Skipping this step can lead to costly rework or visible cabling that undermines the clean design.
Skipping layout mockups: Without visual previews, lights often end up unevenly spaced, off-axis, or poorly aligned with wall features. This creates asymmetry and disrupts visual flow.
Correcting these issues after installation typically involves reworking masonry or re-routing power, which is time-consuming and expensive. Prioritizing smart planning and mockups early on helps ensure your brick lights perform beautifully from day one.

Quick Checklist Ideal Brick Light Setup
✅ Do
✔ Mount on risers, not tread surfaces
✔ Keep height low: ~100-150mm on steps, ~200-300mm on walls
✔ Space evenly (~1-1.5m) for continuous runs
✔ Use IP65+ for exposed outdoor zones
✔ Prefer warm white (2700–3000K) for social areas
✔ Combine with layered outdoor lighting
❌ Don’t
✘ Overcrowd small areas
✘ Mount too high (glare risk)
✘ Skip wiring/conduit planning
✘ Neglect temporary mockups
✘ Rely on brick lights as the only outdoor light source

Conclusion
Brick lighting enhances both safety and ambience but only when placed with care. Thoughtful positioning around circulation routes, architectural lines, and landscape features ensures that your fixtures guide guests, define spaces, and elevate outdoor design without visual clutter.
Brick lighting should feel like quiet contributors not impositions to your outdoor lighting plan. Paired with other fixtures in a layered scheme and tuned with LED quality, colour temperature, and smart spacing, they can transform the nighttime experience of your home.