
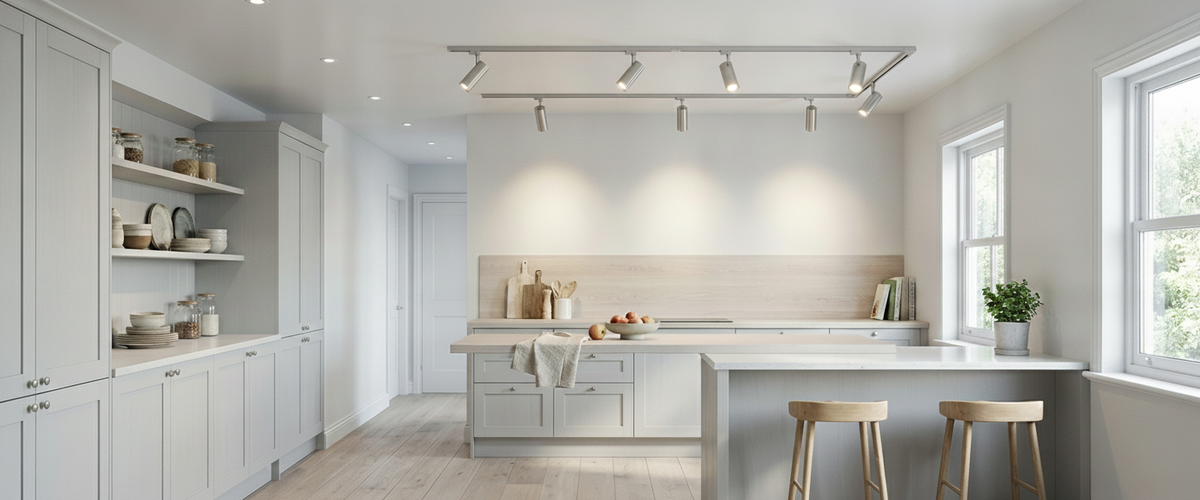
Track lighting for kitchen worktops fails for one dull reason: the heads point at the cabinet doors instead of the counter where you actually chop, read a recipe and pour. The fix is simple. Aim, space and split your runs so every zone gets light and no corner goes dark. Good track lighting for kitchen use answers this directly: place the run slightly in front of the units, tilt the heads back, and light the front third of the worktop. Get the aiming right and a single run can do the work of six recessed downlights, with far more flexibility. Get it wrong and you are lighting your cupboard fronts beautifully while squinting at the onions.
Track suits kitchens because you can add, move and re-aim heads as the room changes. That said, track lighting for kitchen schemes works best as one layer, not the whole thing. Pair adjustable spots for task work with something softer overhead, and the room stops feeling like a workshop after dark.
Aim the beams at the front third of the worktop, not the cupboard doors.

Key Takeaways Before You Buy
Aim at the worktop edge, roughly the front third of the counter, not the cabinet face.
Run length follows the worktop, not the ceiling centre line. Offset the track toward the units you use most.
Plan one head per 60 to 90 cm (24 to 36 inches) of active worktop as a starting point, then adjust.
An island usually needs its own run or a set of pendants; perimeter track rarely reaches it well.
Dimming and adjustable colour temperature turn bright prep light into calmer evening light.

Read the Kitchen as Zones First
Before you count heads, walk the room and mark where you stand still. The chopping stretch by the hob. The sink. The coffee corner. The spot where post and keys land. Those are your task zones, and each one wants a spot aimed at it. Good track lighting for kitchen work leaves the gaps between them dimmer; nobody needs full brightness over a run of closed drawers.
This zone-first habit is what separates a considered scheme from a shop-fit grid. Picture a narrow galley with eight downlights in two neat rows where the cook still chops in shadow, because every fitting sits over the walkway rather than the counter. Swap the lot for a single offset run and five aimed heads: fewer fittings, more usable light. That is the whole argument for kitchen track lighting in one sentence.

Run Length and Head Count for Galley, L-Shaped and Island Layouts
The layout dictates the track, so plan the geometry before the fitting. Good track lighting for kitchen layouts starts with the shape of the room. Once you match the run to the plan, kitchen track lighting stops being guesswork.
Galley kitchens reward a single straight run offset toward the busier worktop. If both runs of units get heavy use, a longer run down the middle with heads angled to each side can cover both, but you will trade a little intensity for coverage. Expect one head per 60 to 90 cm (24 to 36 inches) of worktop you actually use. This is where good track lighting for kitchen counters earns the surface it lights.
L-shaped kitchens almost always need a corner. Rigid track plus an L-connector follows the units around the bend; where a bulkhead or awkward ceiling gets in the way, a flexible connector lets you soften the angle without breaking the run. Put a head close to the inside corner, because that is the classic dead spot where two runs of units meet. Good track lights for a kitchen never skip that corner.
Island layouts are the honest test. One perimeter track can rarely light the counters and the island well, since the throw distance and angle are wrong for both. Treat the island as a separate job, and let a second run of track lighting for kitchen use carry it. More on that below.
If you want to see how the parts of track lighting kitchen systems fit together, spotlight heads, connectors and feeds, before you commit to a plan, browse the wider lighting collection to get a feel for the component approach.
Match the run to your layout: straight for galleys, an L-connector for corners, a dedicated run for islands.
Throw Light onto the Worktop Edge, Not the Cabinet Face
Here is the single most useful move in the whole guide. Position the track so heads sit slightly in front of the cabinet line, then tilt them back toward the wall units. The beam should land on the front third of the worktop, the part nearest you, where your hands and the chopping board live. This one habit fixes most track lighting for kitchen problems.
Two things go wrong when people skip this. First, a run pushed tight against the wall throws light straight down the cabinet doors and grazes the backsplash, leaving the working surface in your own shadow every time you lean in. Second, heads aimed straight down create bright pools with hard dark gaps between them. Angle the beams and the pools overlap into an even wash. Where you want to fine-tune the direction of each pool along a run, a tiltable head such as the GU10 track spotlight gives you that adjustment at the counter rather than fixing the aim at install. Well-aimed kitchen track lights save you from that shadow trap.
A practical starting offset is around 25 to 40 cm (10 to 16 inches) out from the wall for standard-depth units, adjusted on site once you can stand at the counter and check where your own shadow falls. Always test with someone standing in a real working position, not from the doorway.
Island Versus Perimeter: When One Track Cannot Do Both Jobs
An island sits too far from the perimeter units for a wall-hugging run to reach it at a sensible angle. Try to stretch one run across both and you get weak, flat light on the island and glare bouncing off the hob. This is where track lighting for kitchen islands needs two runs, not one.
Give the island its own treatment. A short dedicated run above it, aimed down at the surface, keeps prep light where you need it. For that steady overhead output you want a higher-lumen fitting, and a 38W LED track light with selectable colour temperature covers the island surface while letting you shift from crisp prep light to a warmer evening tone. Many kitchens look better with a pair or trio of pendants over the island instead, which is where alabaster and natural stone earn their place. A carved alabaster pendant gives a warm, diffused glow overhead that flatters food, faces and stone worktops, while the aimed spots handle the sharp task light around the edges. That contrast, soft centre and crisp perimeter, is what makes a kitchen feel designed rather than merely bright.
Niori works in alabaster, marble, onyx and natural stone precisely for that softer layer. If your island is where people gather with a glass of wine, a stone pendant reads as furniture, not equipment. You can see how those diffused forms behave in the alabaster lighting collection, then let track carry the functional load elsewhere.
Dimming and Colour: Prep Light That Becomes Dinner Light
A kitchen does two jobs a day and they want different light. Good track lighting for kitchen use accounts for both. Chopping and reading labels calls for bright, cool-leaning light around 3500 to 4000K. Sitting at the island after dinner wants something warmer, nearer 2700K, at a fraction of the output.
Adjustable colour-temperature (CCT) heads let one fitting cover both. Wire the circuit to a compatible dimmer and you can drop the perimeter to a low glow while the island pendant carries the mood. This is where kitchen lighting track lighting really shows its value. Choose LED heads and dimmers rated to work together; mismatched pairings are the usual cause of flicker and buzz at low levels. Dimmable track lighting for kitchen schemes is what turns hard prep light into something you want to sit under. The Chartered Institution of Building Services Engineers publishes useful guidance on light levels and quality for domestic and working spaces if you want the technical grounding (cibse.org).
For colour rendering, aim for a CRI of 90 or above. Food and stone surfaces both look dull under cheap low-CRI light; greens go grey and marble veining flattens out. It is a small spec line that changes how the whole room reads, and it is where track lighting for kitchen worktops either earns its keep or lets you down.
Placement Mistakes That Leave Dark Corners and Hot Spots
Centring the run on the ceiling. The ceiling centre almost never lines up with the worktop. Follow the counter, not the room.
Too few heads, spaced too far. Wide gaps give you spotlit islands of light and shadowed valleys between. Add a head or tighten the spacing.
Ignoring the corner. Inside corners on L-shaped runs are the first place to go dark. Put a dedicated head there.
Aiming straight down. Vertical beams create glare on glossy worktops and leave the vertical prep zone dim. Tilt them.
Forgetting the sink and hob. These are task zones too. A hob usually has extractor lighting, but the sink rarely does; give it a head.
One colour temperature for everything. Bright cool light everywhere makes evenings feel clinical. Build in dimming from the start.
Avoid these and your kitchen lights track scheme will hold up years after install. That is what separates lazy kitchen track lights from a layout that keeps working.
A Quick Buyer's Checklist
Map your task zones on paper before choosing any fitting for your track lighting for kitchen plan.
Decide single-circuit or multi-circuit, so island and perimeter can dim independently if needed.
Count heads: one per 60 to 90 cm (24 to 36 inches) of active worktop as a baseline.
Choose CCT-selectable LED heads with CRI 90+ and a matching dimmer.
Confirm connectors and power feed for your layout: straight, L, T or flexible.
Plan a softer overhead layer, a stone pendant or ceiling piece, so the room is not all spotlights.
Have a qualified electrician confirm the circuit, load and fixing before installation.
Budget for kitchen track lighting depends on run length, head count, the quality of the LED and dimming components, and any stone pendants you layer over the island, so ask for a tailored quote rather than working to a guessed figure. Kitchen track lighting ideas are worth planning around task zones first. Done well, track lighting for kitchen use is money spent where it shows: colour rendering, dimming quality and the pieces people sit under. Get the geometry and the aim right and track lighting for kitchen worktops quietly does its job for years.