
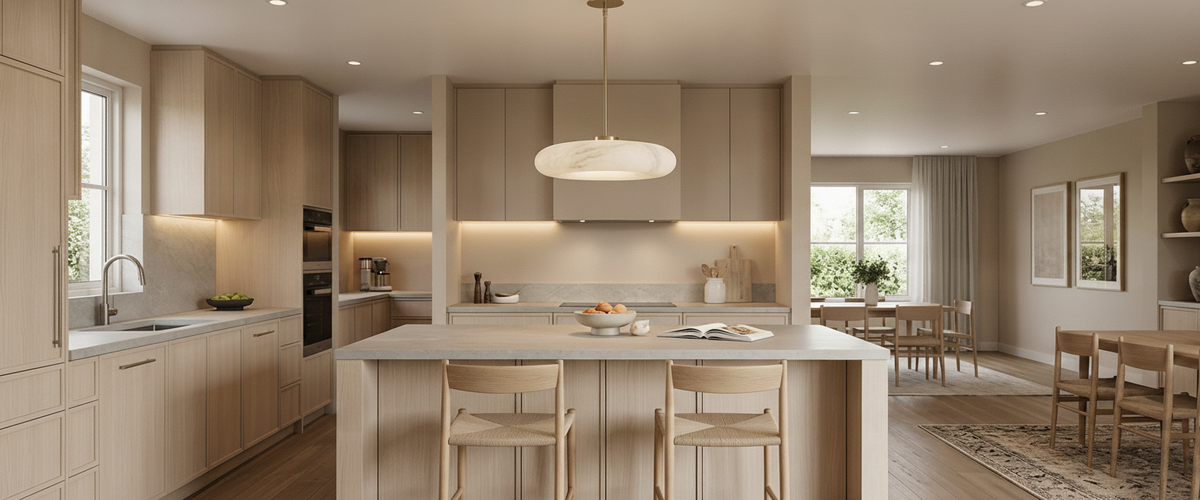

Most kitchens get the same tired treatment: a cold ceiling grid overhead and a single strip of tape shoved somewhere under the wall units, throwing a hard line of light halfway up the tiles. An LED kitchen strip can do far more than that, and the difference between a crisp, considered result and a cheap one comes down to a handful of decisions you make before anything is stuck down.
Get those decisions right and the tape disappears; you see the light, not the source. That matters even more in a kitchen that opens onto a living space, where soft, warm light needs to sit comfortably alongside the alabaster pendants and stone fixtures Niori is known for.

At a Glance: What a Good Kitchen Strip Does
Task light under the wall cabinets, aimed at the worktop where you actually chop and prep.
Ambient wash above the units or under a plinth, softening the room after dark.
Floor glow under a toe-kick, so you can cross the kitchen at midnight without the main lights.
Warm colour temperature (around 2700K to 3000K) to flatter timber, stone, and skin.
Aluminium channel and diffuser to hide dots and give a clean line of light.
Those five points are what any good LED kitchen strip needs to earn its keep.

Three Hidden Runs, Three Different Jobs
Think of an LED kitchen strip installation as three separate jobs that happen to use the same reel of tape. The first is genuine task lighting: the run under your wall cabinets that lights the counter. The second is an ambient wash, usually above the units or behind a cornice, that bounces light off the ceiling and takes the harsh edge off the room. The third is a low floor glow tucked into the toe-kick, purely atmospheric and quietly useful.
Each run wants a slightly different treatment. Task light needs to be brighter and cleaner. The ambient and floor runs can be softer and dimmer. Trying to make one LED kitchen strip cover all three jobs is where people end up with a kitchen that feels like a car park.

Why an Under-Cabinet Strip Belongs at the Front Lip
Here is the mistake we see most often: the tape gets fitted at the back of the cabinet underside, hard against the wall. It lights the splashback beautifully and leaves your worktop, and your hands, in shadow.
Fit the LED kitchen strip at the front lip of the cabinet instead, just behind the door line so the tape stays out of sight. Now the light falls forward onto the working surface where the knife is. A shallow recess or a slim channel screwed to the front underside keeps it hidden and stops that mirror-glare bounce off polished stone or gloss units. If your worktop is a dark honed granite or a heavily veined marble, front-lip placement is the only way to get usable task light off a low-reflectance surface.
Warm or Cool: Matching the Strip to Worktops You Actually Chop On
Colour temperature is where kitchens go wrong more than anything else. Cool white (4000K and up) looks clinical and drains the warmth out of wood, brass, and natural stone. For a home kitchen, stay in the 2700K to 3000K range. That warmth reads as daylight-adjacent without going blue, and it keeps continuity with warmer fixtures elsewhere in an open-plan space. For the under-cabinet run, a warm-white COB reel such as the COB LED Strip 10W/m 12V Warm White Dot-Free Reel sits comfortably in this range without the blue cast that flattens stone.
Pay attention to CRI (colour rendering index) as well. Aim for 90 or above so tomatoes look like tomatoes and your worktop's real colour comes through. When you spec an LED kitchen strip for a whole room, the Chartered Institution of Building Services Engineers publishes lighting guidance on colour rendering and task illuminance that is worth a look (cibse.org).
One practical note from the studio: if a client has veined onyx or marble anywhere in the room, whether a splashback or a nearby stone table lamp, we match the tape's warmth to it. Cool light turns warm stone grey and flat. Warm light lets the veining sing. The same logic applies to the alabaster and natural-stone pieces across the alabaster lighting range; those fixtures glow warm, and a mismatched cool run nearby will fight them.
Bare Tape Versus Channels and Diffusers
Bare tape stuck straight to the cabinet is the fastest way to make expensive lighting look cheap. You see every individual dot, the adhesive lifts over time in a warm kitchen, and the edges of the light are ragged.
An aluminium channel with a frosted diffuser fixes all of that. The channel acts as a heat sink, which extends the life of the LEDs, and the diffuser blends the dots into one continuous line. For the very cleanest LED kitchen strip result, choose a COB (chip-on-board) reel, which has no visible dots at all even without a diffuser. Where a longer continuous run wraps a whole kitchen, a 24V reel like the COB LED Strip 10W/m 24V Cuttable Reel 50m Warm White handles the distance far better than 12V, since voltage drop is much less of a problem at that scale.
Recess the channel where you can. A surface-mounted channel is fine under a cabinet, but along the top of the units a recessed or angled channel throws light up the wall and ceiling more evenly.
Above the Units: The Trick That Makes a Ceiling Feel Taller After Dark
The gap above wall cabinets is usually dead space collecting dust. Run a warm LED kitchen strip along the top, facing the ceiling, and it becomes the most flattering light in the room. The light washes up and across the ceiling plane, which the eye reads as extra height. In a room with a lower ceiling, this single move changes the whole feel after dark.
Keep this run on its own dimmer circuit. On a quiet evening you can drop the overhead lights entirely and leave just the up-wash and the floor glow, which is where an open-plan kitchen starts to feel like a room you want to linger in rather than one you cook in and leave.
Powering, Dimming, and the Wiring You Hand to an Electrician
Most kitchen tape runs on low voltage (12V or 24V), which means a driver (an LED power supply) sits between the mains and the reel. Size the driver to the total wattage of your LED kitchen strip run with headroom to spare; running a driver at its absolute limit shortens its life. Longer runs are almost always 24V, because voltage drop over distance is far less of a problem than at 12V.
For dimming, decide early. Mains dimming uses a dimmable driver and a wall dimmer. Low-voltage PWM dimming gives smoother control at very low levels, which is what you want for the floor glow. If you plan to bring it into a smart system later, choose a driver and controller that talk to your chosen platform before anything is installed.
The tape and channel are a genuine DIY job. The mains side is not. Always use a qualified electrician for the mains connection and any new circuit, and keep to the wiring regulations. The Electrical Safety First guidance is a sensible starting point (electricalsafetyfirst.org.uk).
Quick Install Checklist
Plan your three LED kitchen strip runs and decide which need to be dimmable and on separate circuits.
Measure each run and add the wattage per metre to size the driver correctly.
Clean and dry every surface before fitting channel or tape; grease kills adhesive.
Fit channels first, then lay the tape in, then clip the diffuser.
Only cut tape at the marked cut points, and keep offcuts for shorter runs.
Use IP65-rated tape near sinks, hobs, or anywhere splashing is likely.
Test the full run on the bench before final fixing, then hand the mains connection to your electrician.
Where Strip Light Ends and Feature Lighting Begins
An LED kitchen strip is background work. It shapes the room, lights the tasks, and then gets out of the way. What it will never do is give a kitchen a focal point. That job belongs to a pendant over the island or a pair of wall lights flanking a window, and it is where a warm alabaster or natural-stone fixture earns its place. The soft, diffused glow of carved stone reads as the warm centre of the room, while the LED kitchen strip does the quiet, invisible work around it. Get both layers pulling in the same direction, at the same colour temperature, and the kitchen finally looks lit rather than just bright.