Table of Contents
- Introduction
- Quick Summary
- What’s The Best Way To Space Downlights in a Kitchen For Clean, Even Light?
- How Far Out From The Wall Should Kitchen Downlights Be?
- How Far Apart Should Downlights Be For an Even Look?
- What Are The Biggest Do’s and Don’ts When Planning Kitchen Downlights?
- How Many Downlights Do I Need In My Kitchen?
- What’s The Step-by-Step Method To Plan Downlights Spacing Properly?
- How Do I Get Bright, Clean Light Without The Kitchen Feeling Harsh?
- How Do I Avoid Downlights That Flicker?
- Warm Downlights vs Cool Downlights: Which is Better in a Kitchen?
- Conclusion
- FAQs
Introduction
Getting kitchen lighting right with downlights is less about buying “more” and more about placing light where you actually work. Poor layouts often lead to gloomy worktops, harsh glare, and bright floors with dark counters. The fix is usually a smarter layout, not extra fittings. When the beam lands in the right place, the whole kitchen feels cleaner and easier to use with downlights that are planned properly.
This guide focuses on one thing: the do’s and don’ts of spacing so your kitchen looks even and comfortable. You’ll learn how to position fittings to reduce shadows on prep areas and avoid patchy pools of light. We’ll also cover simple checks that help you balance task brightness with a softer evening feel. Done properly, the ceiling looks tidy and the light feels natural rather than forced.
Quick Summary
Clean, even kitchen lighting comes from planning around work zones, not the centre of the ceiling and downlights work best when they’re placed for tasks first. Place fittings so the light lands on the worktops where you prep, wash up, and cook. Keep rows consistent so the ceiling looks tidy and the light overlaps smoothly. Use separate switching and dimming to control brightness for cooking, dining, and evenings. Avoid common mistakes like central grids, mismatched colour temperatures, and low-quality components that can cause flicker.
What’s The Best Way To Space Downlights in a Kitchen For Clean, Even Light?
Plan spacing from the worktops outward, not from the middle of the room when using downlights. Kitchens are task spaces, so the most important light is the light that falls on prep surfaces, the sink, and the hob area.
A good layout does five things:
Lights the front half of the worktop, where hands, tools, and ingredients are actually used
Minimises shadows created by your body when standing at the counter
Avoids obvious pools of light and dark gaps across the work surface
Keeps the ceiling looking balanced rather than cluttered with fittings
Makes the kitchen easier to work in at all times of day
If your current kitchen feels “spotty”, it’s usually because fittings were spaced evenly across the ceiling instead of being positioned to support real tasks.
How Far Out From The Wall Should Kitchen Downlights Be?
A reliable starting point when positioning downlights is placing them about 60-75 cm out from the wall line of your base units. That puts the beam where you need it: onto the working surface, not behind you.
Why this works in real kitchens:
Most people stand roughly 40-60 cm back from the counter edge.
A ceiling light directly above your head throws your shadow forward onto the chopping board.
Moving the row slightly towards the worktop helps the beam “reach” the task area.
Do
Run a row parallel to the units.
Keep the row straight and consistent along long worktop runs.
Don’t
Push the lights tight to the wall (you’ll wash cupboard doors and miss the counter).
Put one central row and expect it to cover the entire room.
How Far Apart Should Downlights Be For an Even Look?
Most kitchens land in the 1.0-1.5 metre spacing range, adjusted for ceiling height and beam angle. The goal is overlapping beams on the surfaces, so you don’t see bright circles separated by dull patches.
Spacing changes most with:
Ceiling height: higher ceilings often need closer spacing, wider beams, or more output.
Beam angle: narrow beams need closer placement; wider beams can spread further.
Finish reflectance: matte, dark surfaces “eat” light; glossy pale surfaces bounce it.
Room layout: islands, peninsulas, and tall units can break up open space and need their own lighting plan.
Fitting output and lens design: higher-lumen fittings or diffused optics can allow slightly wider spacing without patchiness.
A quick sense check: if you can clearly “count” individual pools of light on the floor, the layout often feels more like a showroom than a home kitchen.
What Are The Biggest Do’s and Don’ts When Planning Kitchen Downlights?
Start with task lighting, then add general lighting only where it’s genuinely needed.
Do: build a task-first layout
Prioritise prep zones and the sink.
Add light where you stand and work, not where you walk through.
Do: keep rows tidy
Even spacing within each row looks calmer and more intentional.
If you need to shift a fitting, do it for a reason (like a tall unit, extractor position, or skylight).
Do: separate circuits
Put the task row on one switch and the rest on another.
Dimming gives you control without changing the layout.
Don’t: copy a “grid” from another room
Kitchens are full of tall units, cupboards, and task areas, so lighting needs to respond to that.
Don’t: over-light for the sake of brightness
Too many fittings can feel harsh and create glare on glossy cabinets and worktops.
If your kitchen also needs accent lighting for evenings, consider a different layer such as wall lights in a dining nook or open-plan area, kept separate from the task circuit so the room can soften after cooking.
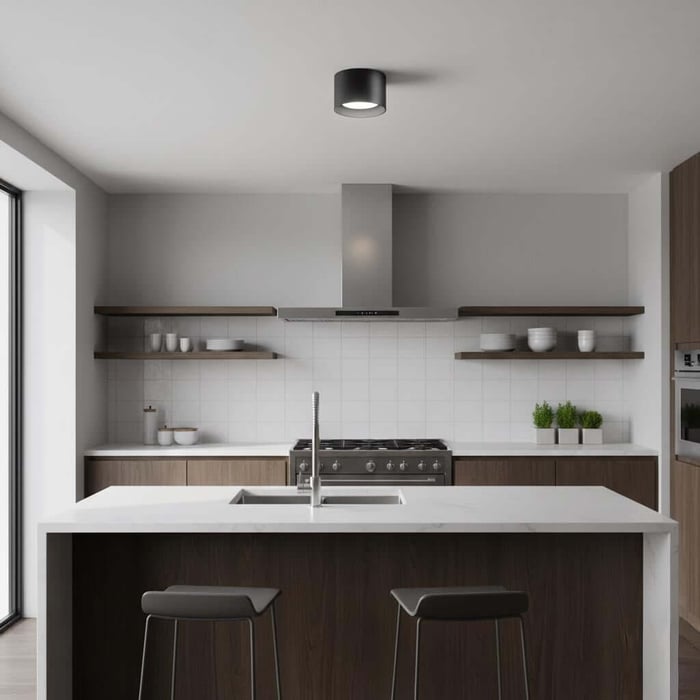
How Many Downlights Do I Need In My Kitchen?
Count fittings by each worktop run first, then add only a small amount for general fill. That approach avoids the common trap of buying a fixed number based on room size alone.
A practical way to estimate:
Measure each main worktop run (for example, 3.6 m, 2.4 m, island length).
Use your chosen spacing (often 1.0-1.5 m) to place fittings along the run.
Add a dedicated point for the sink if needed.
Add one or two “fill” points only if there are obvious dim corners.
Example:
3.6 m run: typically 3 fittings spaced around 1.2 m apart
2.4 m run: typically 2 fittings
2.0-2.4 m island: often 2-3 fittings depending on whether you also use pendants
If you’re using branded fittings like PowerMaster, make sure the beam angle and output suit the spacing you’re planning; matching the product to the layout matters as much as the count.
What’s The Step-by-Step Method To Plan Downlights Spacing Properly?
Follow this simple method to plan downlights in a way that creates an even layout and delivers reliable light exactly where it’s needed on the worktops.
Mark your work zones:
Sketch the room and highlight worktops, sink, hob, and island prep areas:
Draw the worktop lighting line:
- For runs with wall units, draw a line 60-75 cm out from the units. That’s your main row position.
Place fittings along each run:
- Start around 1.0-1.5 m apart and adjust to suit beams and ceiling height. Aim for visual balance at the ends.
Add targeted task points:
- Consider an extra point over the sink and your main prep spot if they fall between fittings.
Check for shadows and glare:
- Stand where you’ll prep most and imagine light falling in front of you onto the counter. If the counter would be shaded, shift the row slightly.
Plan switching and dimming:
- Split into at least two circuits: task row and general/feature. Dimming is ideal for evening comfort.
Sense-check the ceiling:
- Avoid placing fittings where they’ll clash with extractor ducting, ceiling speakers, or cabinet line.
How Do I Get Bright, Clean Light Without The Kitchen Feeling Harsh?
Use strong output where you prep, and softer output for general fill.
Add under-cabinet strips to remove shadows on the counter edge.
Choose fittings with good glare control (deeper recess or baffles help, especially with glossy surfaces).
Put task lighting and ambient lighting on separate switches, so you’re not forced into “full brightness” all evening.
Use dimmers where possible to fine-tune levels for meals, cleaning, and late-night kitchen trips.
Avoid aiming beams straight at shiny splashbacks or glossy cabinet doors, as this can create distracting hotspots.
For islands, if you want a decorative feature, you can add pendants and reduce the number of ceiling fittings. A clean option is a simple spotlights style over the island for focused task light, with the rest of the kitchen kept softer on a separate circuit.
How Do I Avoid Downlights That Flicker?
Choose quality LED drivers and make sure they’re compatible with your dimmer and your wiring plan, especially when using downlights. Flicker isn’t just annoying; it can make a kitchen feel uncomfortable, especially on low dim levels.
Here’s what to do:
Pick reliable drivers: Look for products designed for stable output, particularly when dimmed.
Match dimmers properly: Many flicker problems come from older dimmers not suited to LED loads.
Keep circuits consistent: Avoid mixing different driver types or mixed brands on the same dimmed circuit.
Don’t overload a dimmer: Too many fittings on one control can cause unstable performance.
If flicker-free dimming is important, choose the control gear first, then pick fittings that are proven to work with it.
Warm Downlights vs Cool Downlights: Which is Better in a Kitchen?
Most kitchens look best with a balanced, clean tone that suits the finishes and feels comfortable day to night, and downlights play a big part in achieving that balance. Very cool light can make kitchens feel clinical, while very warm light can make whites look creamy or dull.
A simple way to decide:
If your kitchen flows into a living area, lean slightly warmer for a more relaxed feel.
If you have a very modern, high-gloss white scheme and want a crisp look, you may prefer a cooler tone.
If you have lots of natural timber, warmer tones usually keep the space looking richer and more natural.
If your worktops are dark stone or matte finishes, a cleaner neutral tone can help keep prep areas looking clear.
Whatever you choose, keep it consistent across ceiling fittings, under-cabinet lighting, and pendants.
If you can, test a sample in the evening as well as daytime, because the same light can feel very different after sunset. The right choice is the one that makes food, skin tones, and finishes look natural in your kitchen.
Conclusion
A kitchen looks brighter and more polished when the lighting is planned around the worktops rather than the centre of the ceiling. Place rows about 60-75 cm out from units, keep spacing consistent, and use switching and dimming to balance task brightness with evening comfort. Avoid the common mistakes central grids, too many fittings, mismatched colour temperatures, and incompatible dimming that cause shadows, glare, and flicker. With downlights planned for tasks first and a tidy ceiling layout, you’ll get clean, even light that works every day.
FAQs
How many downlights do I need in my kitchen?
Work from your worktop runs first, then add minimal general fill. Most kitchens need fewer fittings than expected once the lights are positioned correctly over prep areas. A task-first layout beats a “one number fits all” approach.
How far apart should downlights be in a kitchen?
A common starting range is 1.0-1.5 metres apart, but it depends on ceiling height and beam angle. Narrow beams often need closer spacing, while wider beams can sit further apart. Aim for overlapping light on the worktops.
How far from the wall should I place them?
Around 60-75 cm out from the wall unit line is a solid rule of thumb. This helps the beam land on the worktop rather than behind you. It also reduces shadows where you chop and prep.
Why are my worktops dark even though the room feels bright?
Often the lights are too central, so your body blocks the beam when you stand at the counter. Moving the row towards the worktop line solves this more effectively than adding extra fittings. Under-cabinet lighting can also help.
Is it a mistake to put lights in a perfect ceiling grid?
In kitchens, yes, it often is. A grid may look neat on paper but can light the floor more than the counters. Kitchens need task-led placement that follows the units and work zones.
What’s the best layout for a galley kitchen?
Usually two parallel rows, each positioned to light the worktops on both sides. Avoid a single central row because it tends to cast shadows on both counters. Keep switching simple so the space doesn’t feel over-lit.
Can I use dimmers with kitchen lighting?
Yes, and it’s one of the best upgrades for comfort. Make sure the dimmer is designed for LED loads and is compatible with the drivers. Poor compatibility is the most common cause of flicker.
How do I avoid glare from ceiling lights?
Choose fittings with good glare control and avoid placing them where you’ll look directly into the beam. Over-lighting glossy surfaces also increases glare, so keep the layout efficient. Dimming helps, especially in open-plan spaces.
Should I add extra lights over the sink and hob?
Often it helps, especially if those areas sit between fittings in the main row. The key is aiming light onto the task area without creating harsh brightness. In some kitchens the extractor and the main row already cover the hob well.
What colour temperature should I choose?
Pick a tone that suits your finishes and feels comfortable at night. Very cool light can feel clinical, while very warm light can soften contrast too much. Consistency across all fittings matters more than chasing a specific “perfect” number.